Precautions
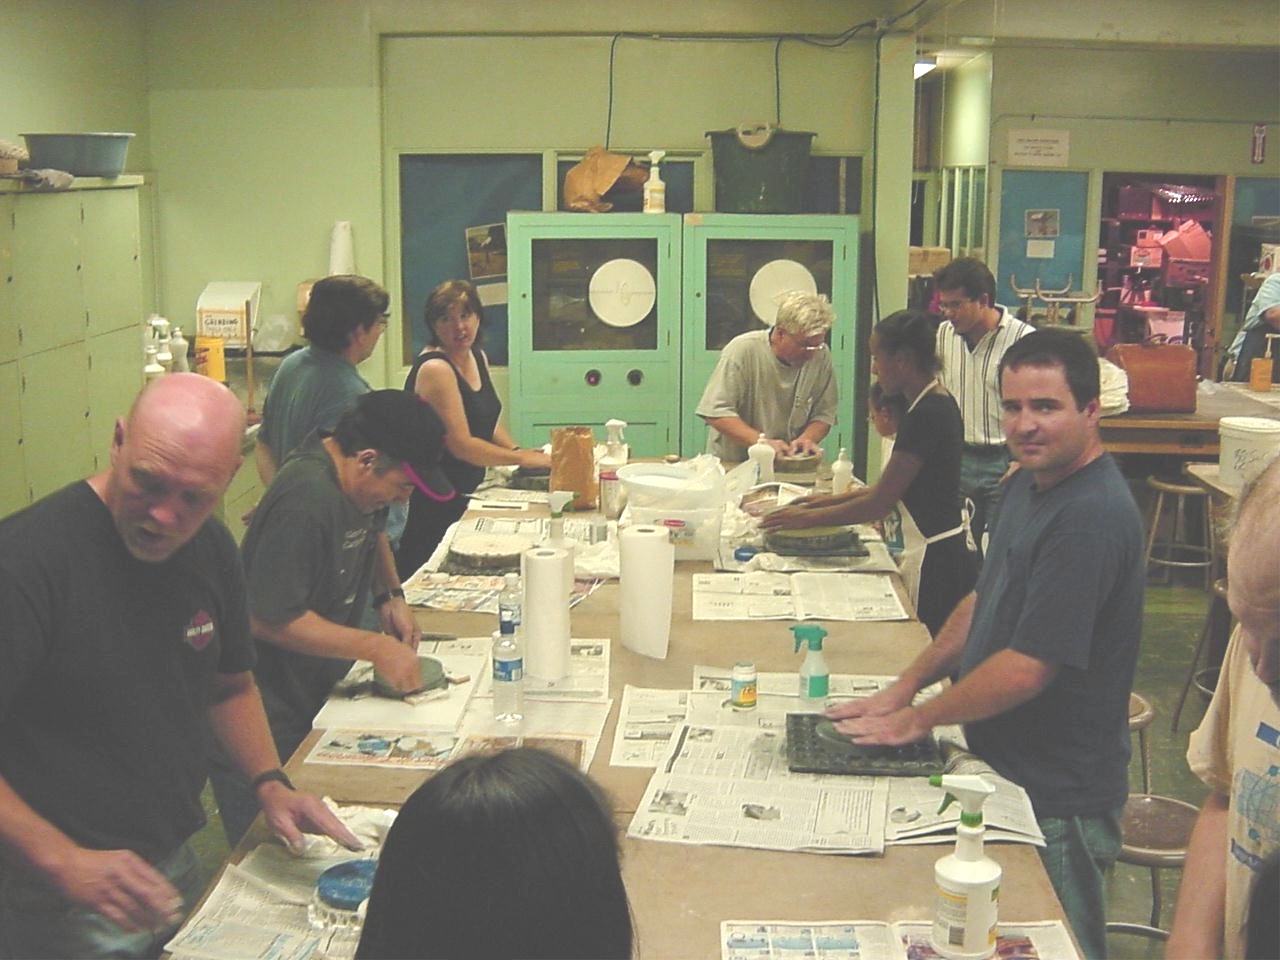
The Mirror Workshop
Rough Grinding
Rough Grinding Large Mirrors
Fine Grinding
Polishing
Pressing the Lap
Correcting
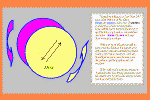
Mirror Testing
A Quick Test after the Mirror is Coated
Precautions
Find a plastic wash pan to place in your porcelain sink. If you have two mirrors keep them separate. If you have a 16 or an 18 3/4 inch green glass blank there is a special precaution. Glass has a low thermal conductance. Green glass has a high expansion coefficient. Green glass absorbs infra red heat radiation. If you put your green glass mirror in a pan with cold water and put the pan out in the sun the mirror will split in half. We don't recommend plate glass for the primary mirror. Some plate glass seems to be liable to acid attack making recoating impossible. Pyrex mirror blanks are quite satisfactory.
The Mirror Workshop
In the 50's people would get a 55 gallon drum, put 5 gallons of water in it and build a wooden top to hold the mirror. Rotating the mirror and working around the drum kept both mirror and tool symmetrical.
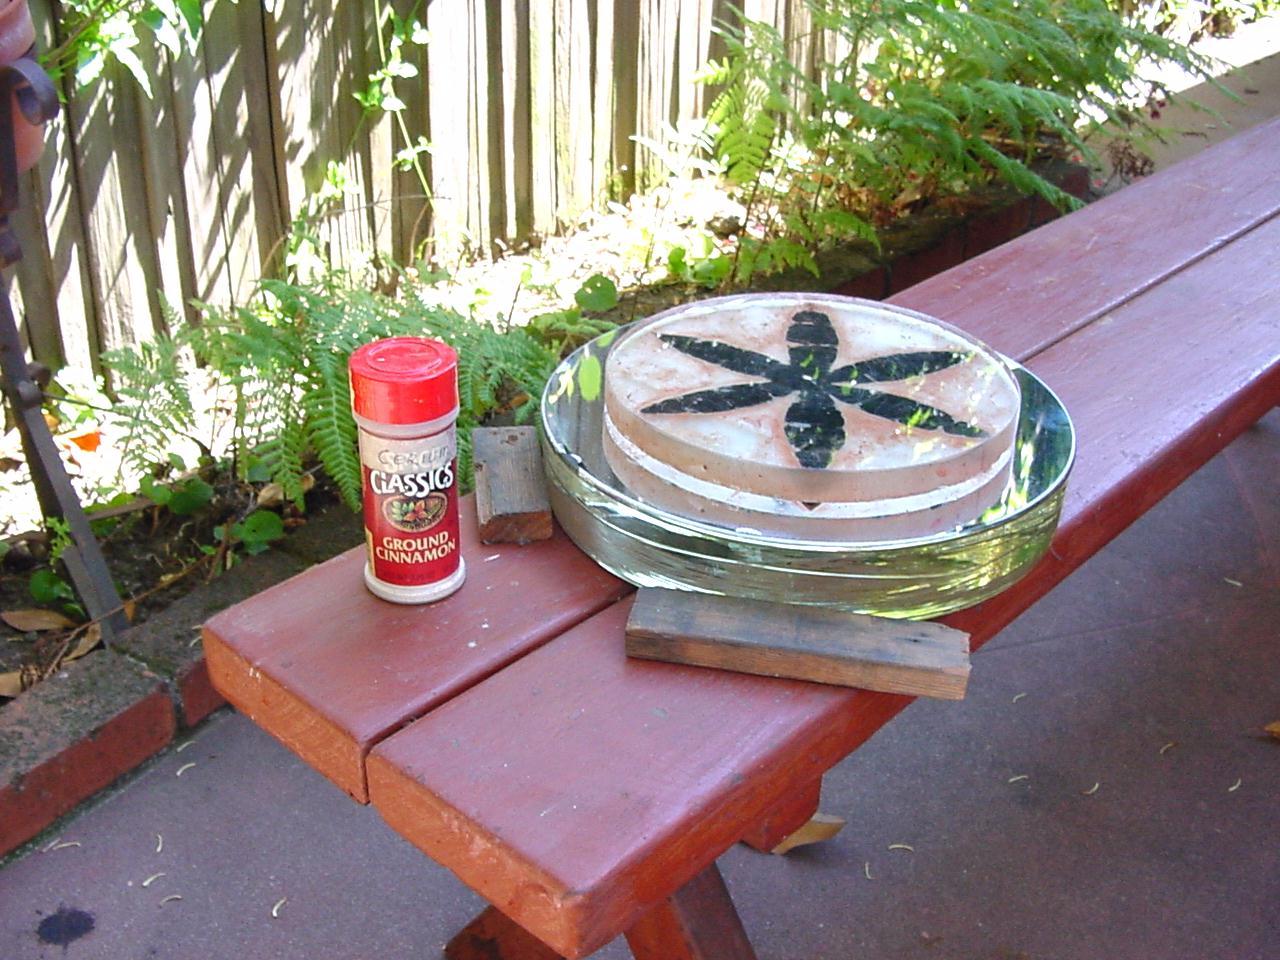
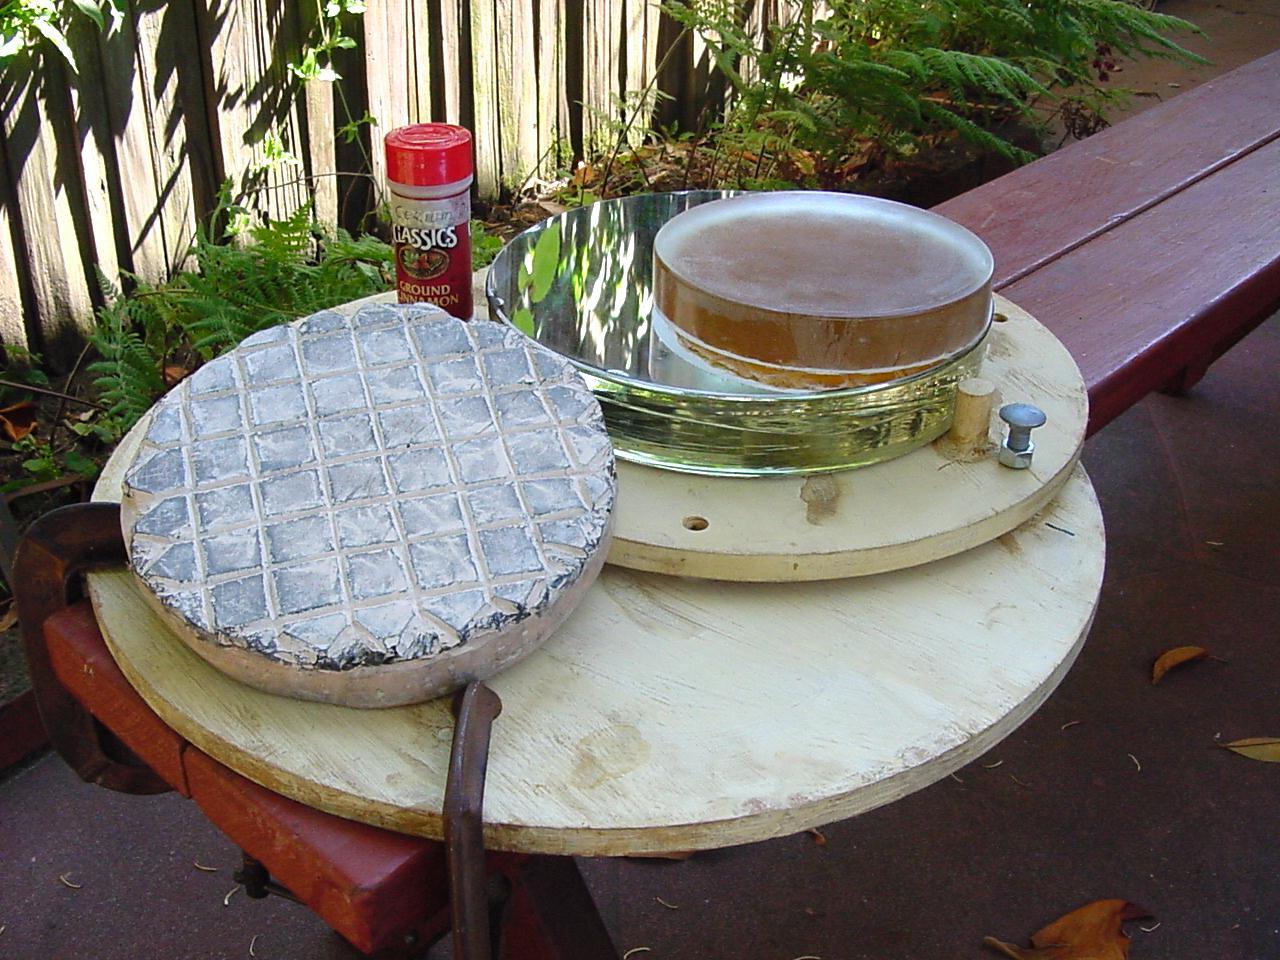
Here we see the Telescope Makers Workshop at the old Chabot Observatory. Many excellent mirrors have been produced here. This is classic John Dobson style. Blocks nailed to a redwood bench hold the mirror or tool. This is our latest idea. Two plywood circles held together with a lazy Susan bearing. A bolt indexes the top circle while polishing. 'C' clamps hold the bottom circle to the bench.
Rough Grinding
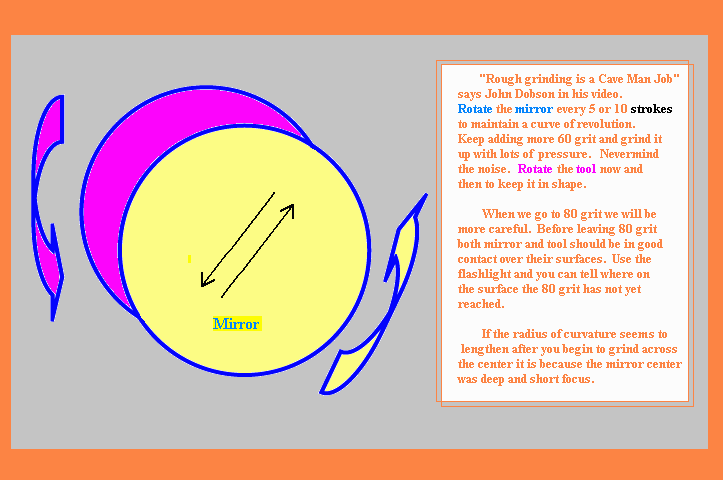
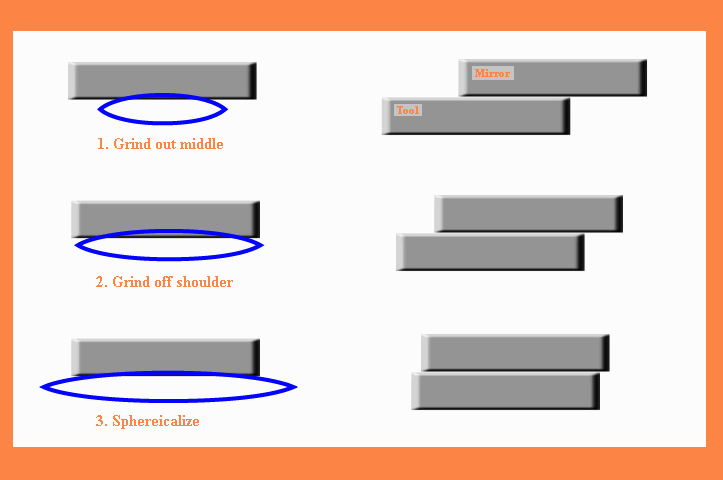
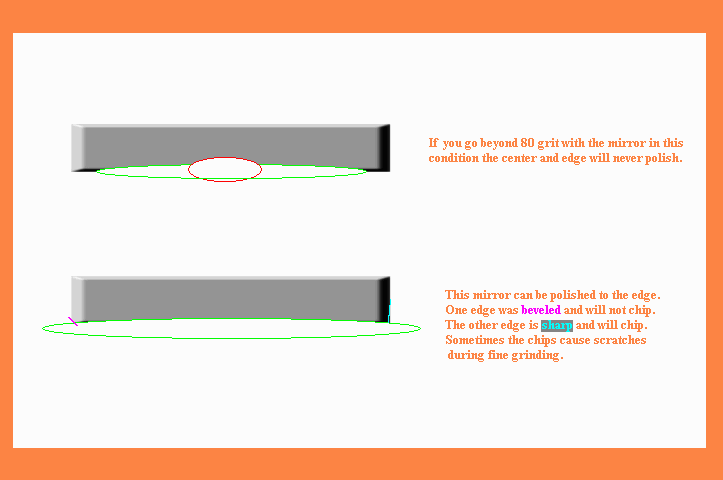
The disk of ceramic, Pyrex or glass porthole which is to be the mirror is ground across the edge of the tool glass with 60 mesh carborundum grit and water between. The mirror disk is rotated every few strokes to form a surface of revolution. A depression is ground in the center of the mirror and the edge of the tool glass is worn away. When the center of the mirror is deep enough the mirror strokes become more near to crossing the center of the tool. The optimum objective is to have the mirror ground to the edge with the proper radius of curvature in the minimum time. The common defect seen on the mirror after coating is that there are 60 grit pits in the center of the mirror or at the edge. The center of the mirror will be in the shadow of the diagonal mirror so this is not a critical defect. The ground edge is more significant. Be very careful not to get the edge rolled down or turned down. Don't rough grind with the mirror on the bottom with a full size tool. This can turn the edge quickly. After rough grinding the next grit is 80 mesh. Possibly if you grind with 80 mesh a little longer than normal with the center of the mirror strokes crossing the center of the tool the rough grinding defects could be reduced.
The other common defect at this stage is that the edge of the mirror becomes sharp. Once the mirror edge is sharp little chips will begin to break off around the edge of the mirror. During fine grinding these chips will make little scratches. The scratches won't hurt the performance of the mirror but some people are perfectionists. To avoid the scratches keep the mirror edge dull with alumina sandpaper and a block or with a by hand grind stone. To save time while rough grinding use enough pressure to pulverize the 60 grit in a reasonable time. To measure the radius of the curve on the mirror to be, smear the surface with water and with a flashlight back away from the mirror. The reflection of the flashlight in the mirror will become larger and larger until it covers the entire mirror. Measure the distance from your eye to the mirror. For six inch mirrors this distance could be 90 inches. For a 12 inch mirror this distance could be 150 inches. If you plan a short focus mirror be sure to stop shortening the focal length 8 or 12 inches long because the focal length will continue to shorten during fine grinding. The twist drill sphereometer is an alternate method for determining 'radius of curvature'.
Making a mirror with an F# longer than F8 tends to make the final telescope too long to be portable. Telescopes with an F# shorter than F5 will be hard to parabolize, have more coma, and not be usable with longer focal length eyepieces.
Rough Grinding Large Mirrors
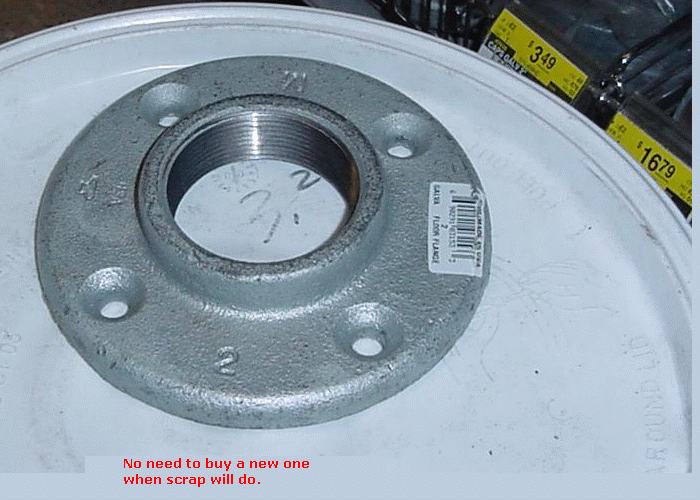
With the mirror on it's back grind the center of the mirror with a smaller size tool glass or an iron pipe flange being careful not to roll the edge of the mirror by allowing the tool strokes to be too long. Most any piece of scrap iron can be used if it is big enough so you can get a good grip. After the radius of curvature is close to what you want make a full size tool from concrete or Plaster of Paris. Epoxy bathroom tiles to the tool face with one hour epoxy or dental epoxy. Or if available use pillow shaped glass facets. The tiles must be firmly attached so as to not become loose during fine grinding. CAUTION, keep epoxy hardener away from your eyes.
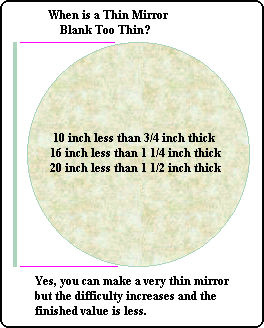
Thin mirrors larger than 16 inches need to have the mirror back flat or parallel to the mirror face otherwise an astigmatic surface tends to be generated on the mirror face while grinding. Large short focus mirrors require lots of glass removal. Sometimes this can be done with a sandblaster and a carefully made template. A friend attached a bevel grinder with a diamond disk to a piece of pipe and chain. The chain attached to a large tree limb provided a rough radius to hog out the mirror center. This must be done under a water spray and with eye protection. The mirror edge is very fragile so stay away from the edge when doing this. There is also the possibility of electrical shock so rubber gloves would be appropriate. I haven't tried this method myself but it is said to be fast. I wouldn't try it on thin mirrors. Ref 1.
There is a lot of information about 'generating mirrors' on the internet. Ref 2, Ref 3, Ref 4, Ref 5. One of my coating customers told me he could rough out three eight inch mirrors in an afternoon. Another, a telescope making instructor, told me he always roughed out the blanks for his classes. Companies such as 'United Lens' have shops to do this type of work.
Fine Grinding
Fine grinding grits; 80, 120, 220, 400, 900. Instead of 900 grit mirror makers are now using 12 micron AlO abrasive. To save time polishing you may use one or two wets of 6 micron AlO after the 12 micron AlO. Grit size reference.
Fine grinding is usually done for about 1 hour per grit. Use warm water with the later stages of fine grinding. After completion of 400 grit inspect the surface with a magnifying glass and compare the mirror center to the mirror edge. Rough grinding problems are easy to pick up at the 400 grit stage. When using the finer grits be careful that the mirror does not become stuck to the tool. If you feel the sliding friction begin to increase stop and wash the mirror and tool and add fresh abrasive. If the mirror becomes stuck soak the mirror and tool overnight. The defect I have been seeing here ( I think ) is that the mirror became stuck to the tool. Quite a bit of force was used to remove the mirror from the tool and the mirror surface was left marked. The marking was too great to be removed during normal fine grinding and polishing and was visible only after aluminum coating. A few drops of dishwashing liquid in the grinding water might reduce sticking during fine grinding. There are no particular problems with fine grinding except for an occasional 60 grit if you are not careful. If you are not accustomed to clean room work you might do one fine grit per night with a cleanup of the old grit after grinding.
Polishing
Polishing is done on a pitch lap using iron oxide, cerium oxide or other specially prepared polishing compound. The pitch lap is poured on the old grinding tool or on another Plaster of Paris disk. The theory of polishing is that the particles of the polishing compound become embedded in the pitch and act like little bulldozers to scrape the glass. The scrapes on the glass are much smaller than the wave length of light ( .0005 millimeter ) so that the glass becomes polished. A cartoon in the Scientific American Telescope Book shows a grave stone with the caption "Here lies Some Guy who spent a lifetime trying to polish out 80 grit pits".
The channels in the pitch lap allow for flow of the cerium oxide water mix and also allow the pitch lap to be pressed to the shape of the mirror to within fractions of a wave length of light.
The mirror is polished on the pitch lap using a creamy mix of polishing compound and water.
Eventually the less polishing compound and the greater the pressure the faster the polish. You will need to use light polishing pressure at first until the cerium oxide begins to embed into the pitch lap. Light pressure is always a good idea when the mirror is first placed on the lap. If unknown to you there is a bit of sand or some other particle on the lap it will have some time to sink into the pitch if you go slow at first.
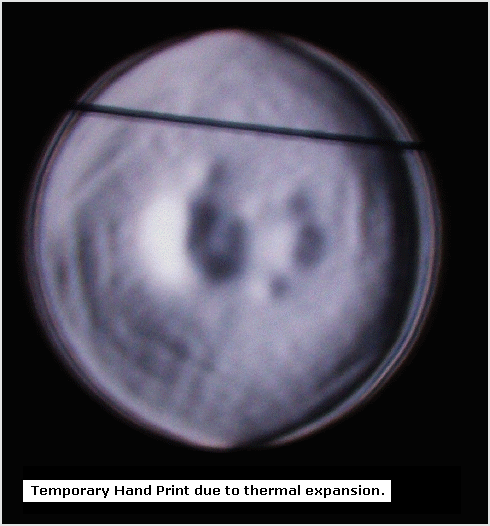
The general method for keeping your mirror spherical while polishing or returning the mirror to the spherical condition from some unwanted figure requires the following steps: Warm the mirror and lap in warm water for about ten minutes. Apply a creamy mix of polishing compound and water to the lap. Press the mirror to the lap with weights for fifteen minutes to a half hour. Polish the mirror across the center of the lap using relatively short strokes. Repeat until the mirror is spherical. Sometimes a donut shaped zone will show up in the Foucault test. If this happens polish slightly off center or use a slight side to side 'W' stroke while polishing. The mirror and the polishing compound should be kept about the same temperature during polishing. If you warm an area on the mirror ( usually the mirror edge ) with your finger so that it expands then polish on the lap the expanded area will be polished away. You will need to clean out the pitch lap grooves with a utility knife now and then. Wash all the chips of pitch away before polishing again. Don't allow your mirror to dry in the air, always wipe the mirror dry.
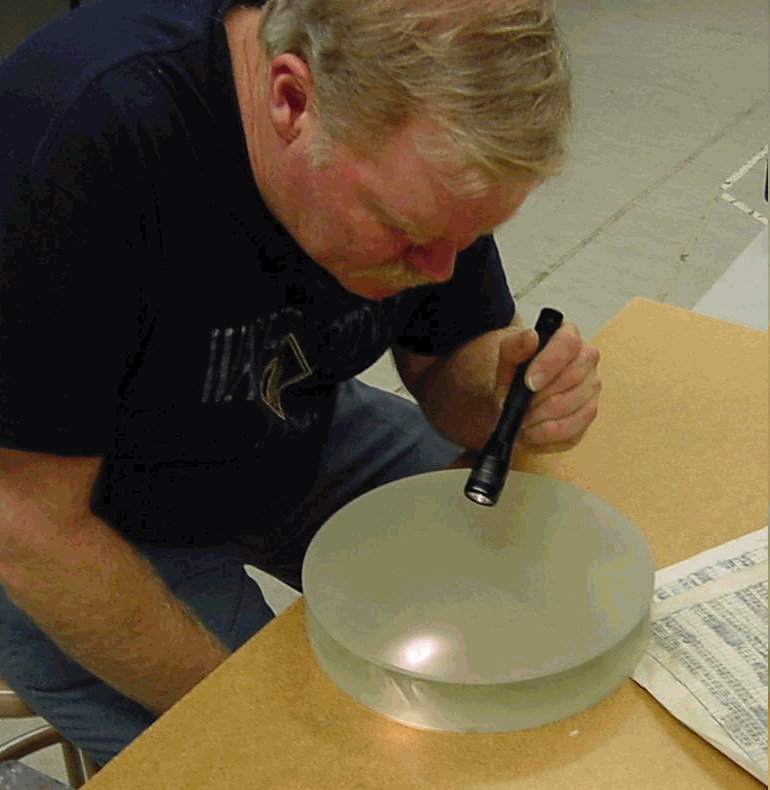
A mirror that is not completely polished will appear hazy after it is aluminized. If the mirror has the proper figure the performance of the telescope will still be good. Use a pin light flashlight close to the polished surface to look for haziness.
Now that you are really into polishing I will tell you to stop and round up the parts for the telescope. Go to building the telescope step by step and get started there. The focal length won't change much from this point and you can test the mirror in the telescope.
Correcting
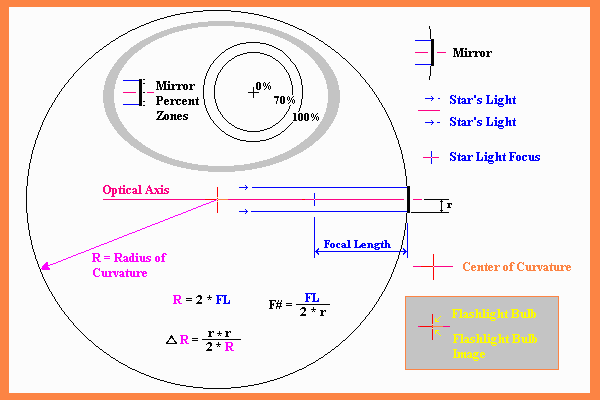
The reason for changing a mirror from a sphere to a paraboloid is explained in alt_13.htm. There are two ways to change the sphere to the paraboloid. You can shorten the radius of curvature of the center of the mirror by polishing glass from the center or you can lengthen the radius of curvature of the edge by polishing glass from the edge. Either way the radius of curvature of the 70% zone should stay half way
between the two. There is always the potential problem of the turned down edge so it is probably better to make our paraboloid by doing something with the center of the mirror. Small mirrors and mirrors with F number larger than F6 are parabolized by polishing on the full size lap using a special parabolizing stroke.
In the video Mr. Dobson uses an eight inch lap to figure a 16 inch mirror. If you plan to polish with the lap on top remember to rotate the mirror. After working with the mirror on top for many hours one might forget to rotate the mirror as often as necessary when the mirror is now on the bottom.
Use light pressure for the final polishing in order to make the surface more even. Some people will shake up the cerium oxide with water and pour off the finer particles from the top to use for final polishing. This may not be necessary but avoid using the mud at the bottom of the CeO water mix. Agitate the mix then draw off the fluid with a large eyedropper available at Long's Drugs. A six inch F8 won't take long to parabolize. More than likely you will need to return the curve to a sphere as described above at least once before getting it right.
Mirror Testing
There are at least three common methods for testing the mirror to find if the curve is correct. The description below would seem to be the easiest to understand and interpret. You should now have a polished mirror and a telescope and we will test the mirror in the telescope uncoated. Bright objects like the moon will be impressive even before the mirror is completed.
Checking the figure of the primary mirror using the suns reflection from a power pole insulator and a ronchi grating.
To use this method we will need to obtain a 100 line per inch ronchi grating. The ronchi grating is merely a piece of glass or film with equally spaced black lines on it. The ronchi grating appears gray from a distance but inspection under a magnifying glass reveals clear glass between the black lines. The ronchi grating is available from Orion, Telescope and Binocular or by mail order from Edmund Scientific Company. Remove the eyepiece from the telescope and place in a safe place. Find a cap that will just slip over the eyepiece tube. Possibly the child proof lid from a gallon can. Glue the ronchi grating to the cap with a little RTV silicon sealant. Find a shady place for the telescope and find a distant telephone pole. Use the telescope finder to point the telescope at the suns glint from a ceramic or glass insulator on the telephone pole. CAUTION, do not point the telescope in the direction of the sun. With your head a foot or so from the eyepiece tube look down the eyepiece tube and center the power pole insulator behind the reflection of the telescope diagonal in the primary mirror. Now install the ronchi grating on the eyepiece tube and place your eye as it would be while looking through the telescope eyepiece. Look at the primary mirror as reflected in the diagonal. Move your head up and down and left and right until the entire mirror appears to light up from the light coming from the insulator. If the mirror were already corrected to a paraboloid you should see perfectly straight black lines that appear to be on the mirror surface. Use the telescope focus to move the grating in and out. The lines become bigger and smaller but always stay straight. If the ronchi grating is exactly at the focus the mirror will be all dark or all light depending whether the focused light strikes a black line in the grating or passes between two lines. The slightest vibration of even 100th of an inch will cause this to change as will the slightest refraction caused by heat waves. Move the ronchi grating toward the tube using the focus control until five dark lines are visible, apparently on the mirror surface. This location for the ronchi grating is the setup used at the Chabot Space and Science Center Telescope Makers Workshop.
If the lines are not straight the mirror is too close to the telephone pole insulator or there is an imperfection of the surface of the primary mirror. If the curve of the mirror were a sphere instead of a paraboloid the lines would be closer together at the center of the mirror and farther apart at the edge of the mirror. This is because the ronchi grating would be nearer the focal point of the mirror edge when inside of focus. Mirror makers call this condition 'under correction' since in the past it has been customary to make the mirror spherical first then 'correct' the figure to a paraboloid. In another common aberration the edge of the mirror focuses too distant from the mirror. The ronchi lines are straight as they should be except at the very edge of the mirror where they narrow. Mirror makers call this condition 'turned edge'. Turned edge is also recognized by the absence of the bright diffraction ring around the edge of the mirror. While testing you may need to try several power pole insulators to find one that is not bothered by heat waves from a warm roof or the like.
On page 47 of the March 1995 'Sky and Telescope' there is a formula which is useful for setting up an artificial star test. To keep the test setup from introducing more than 1/4 wave of spherical aberration on the wave front, the artificial star must be more than:
( mirror_diameter / F_number ) squared * 30 feet from the telescope.
For my 12 inch F6.5 this distance should be 103 feet or more. You may need to extend the eyepiece tube if the 'star' is too close. You should also test the telescope with a knife edge. Glue a utility blade to another child proof cap and place over the eyepiece tube. Using a bright star that is high above the horizon rotate the cap until the drift of the star almost parallels the edge of the blade. Let the star image drift into the knife edge without touching the scope. At the focus point the mirror should gray evenly except for thermal noise as the star image drifts into the knife. The knife edge test using an actual star may not be possible until after the mirror is coated unless your eyes are better than mine.
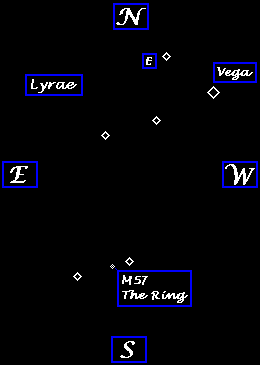
A Quick Test after the Mirror is Coated
If someone at a star party were to come to me and insist I tell them if their optics are OK or not OK I would test their scope on a double star in the constellation of Lira. Vega the brightest star in Lira is near to overhead in the summer evening in San Francisco. Lira is just west of the Milky Way.
Epsilon Lyrae is the famous Double Double star, a 4th magnitude showpiece less than 2 degrees northeast of Vega. A good pair of binoculars will resolve Epsilon Lyrae into a pair of stars. A good amateur telescope will resolve each of these stars into two stars making a total of four stars. The two double stars are currently 2.3 and 2.6 arc seconds apart. There are 360 degrees around the zodiac and 3600 arc seconds in each degree. The separation of the stars in the double double changes over the years. For more complete information see 'Sky & Telescope' July, 1992 page 38 and page 65.