A concave curve

Diamonds are incredible hard stuff. On Mohs scale of hardness diamond is 10 the hardest substance known. Silicon carbide is 9.25 for comparison but this slight difference is deceiving. There is simply no comparison to diamond in stock removal. Diamonds are widely used in the optics industry for high speed production processing of glass. Diamond is somtimes used as a loose powder but is more often incorporated into a metal or resin bonded tools. Diamonds do eventually wear out but the matrix wears with use too which exposes new diamonds to the cutting surface.
Amateurs have largely ignored the use of diamond tools for making telescope mirrors. However I believe there are instances where it does make sense to consider diamond tools saving both time and money. You'll be amazed how fast a diamond tool works if you have done a mirror the traditional way.
"Hogging out" a mirror with loose abrasive is sort of a right of passage for every new telescope maker. With loose abrasive grinding the process is not very efficient however, about as much grit gets wasted as gets used. For just one mirror buying a diamond wheel may not be cost effective but if you are making a big deep mirror the cost of silicon carbide can be considerable even if you are using it efficiently. This is where diamonds will be most helpful to ATMs. For the cost of silicon carbide that you would spend in generating a large deep mirror you could make a diamond tool that could generate a number of mirrors. Texereau in his book recommends buying 2 pounds of silicon carbide for an 8 inch F/6 or F/8 mirror. The F/6 mirror has about 35 cc of glass removed. For say an 18 inch F/5 the glass volume removed is 469 cc and at this rate requires 27 pounds of silicon carbide or $54 dollars at $2.00 a pound. For a big mirror then a diamond tool becomes more viable especially when you consider how much faster diamonds work.
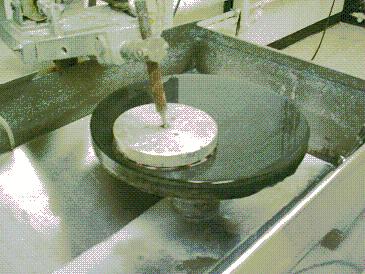
In a curve generating machine the glass is held on a rotating spindle and a diamond tool on a top spindle is tilted at angle that will generate the required radius. The edge of the tool crosses the rotation axis of the glass part making a smooth spherical surface. A water based coolant is used aid this process. This machine is rather beefy like a milling machine. However you don't need such an expensive machine to do generating especially on concave curves. Many amateurs make grinding and polishing machines and these can work for generating as well.
To generate a concave curve on a grinding machine the mirror should be on the bottom spindle with a moderately fast speed (perhaps 500 rpm, depending on your optic size). Ideally the tool should be 1/2 the diameter of the mirror but can still work at small as 1/4 but then you begin to have trouble with the tool rotating properly and sphericity so try to stay close to 1/2 diameter. The diamond tool is driven by a spindle point on the machine and has a small stroke to be sure that the tool edge crosses center. The tool is kept flooded with water or coolant. Pressure on the tool is needed for good efficiency and is simply weight on the machine arm holding the spindle point. The only thing you need to watch is that the tool continues to rotate freely and keep the edge well beveled with a stone to avoid chipping .
|
Stroke for generating A concave curve |

|
Also be sure the tool covers every part of the mirror sometime in its back and forth oscillation. In use with the proper pressure or weight the diamond tool should spin freely and with water or coolant the glass will be removed quickly. Enough pressure must be applied to force the diamonds to work.. You should monitor your progress with a spherometer to be sure you stay spherical and to make sure you don't overshoot your sag. The first time I did this I overshot the sag a lot and had to increase the stroke to make it flatter This is risky and you better have a good bevel at all times and a larger lap. Of course the glass removal rate is going to depend on the diamond particle size as will the surface finish. It is possible to generate a convex curve using this same method by offsetting the stroke farther out towards the edge but I would use more pellets with almost no space between them (a ring tool) and chamfering is even more important to prevent edge chips. Now you can buy a diamond ring tool but they are quite expensive (starting at $200-300 for a small one).
Although I haven't tried it Peter John Smith describes an easy way to make a diamond generating tool using a diamond saw blade on his web site http://www.users.bigpond.com/pjifl. He's got a lot of useful information on his site. He makes a holder for the saw blade to hold it on a mandrel for uses on a milling machine. The inside of the holder is relieved and the center bolt holding the blade pulls the saw blade into a slightly concave shape. I would change things a little by removing the mandrel back and make the tool so that it will run with a spindle point on a polishing machine. This is a really neat idea, you can find a 4.5 inch blade on the net for $9.99 and a 7.25 inch blade for $40. The down side is that you don't have a choice of diamond grit sizes.
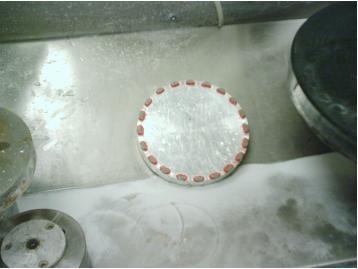
The method I describe to make a diamond tool uses diamond pellets which consists of a metal or resin matrix with diamond particles. They make these by mixing diamond and metal powder then pressing and heating it in a mold. They are available in a wide variety of particle sizes, concentration and matrix material. The size I use are 10 mm diameter by 3 mm thick in a bronze matrix. The diamond size will determine how fast glass is removed 40-60 grit is the coarsest I've used but leaves a rougher surface than 60-80 grit. 120 diamond pellets are too slow for mirrors but OK for smaller lenses. A pellet this sizes runs about $5 to $6 dollars apiece and you need a minimum of 10 and more for a larger tool. These are placed around the edge of a ring tool, you should break each pellet in two with a cold chisel saving on the number of pellets you need but you should have 20 to 40 of these half pellets for your tool. When you break each pellet lay them on a big piece of steel and with the cold chisel resting on the center of the pellet give it a good hit with a hammer. Use a piece of double-sided tape under the pellet so that the halves don't go flying in someone's eye or you lose them. This tool is a bit more expensive than the saw blade method but you will be able to generate dozens of mirrors with a tool so you could spread the cost around by cooperating with other amateurs or clubs. See the list of diamond pellet suppliers below.
So after you have your diamond pellets you need to mount them on a cup tool shaped like this:

The center has a hole to seat the spindle point ball of the grinding machine. It can be hollow for generating convex curves or simply a flat disk if you make only concave curves. There are two ways you can attach the pellets; solder or epoxy. The epoxy must be a high strength preferably thermally cured, your common 5 minute epoxy won't do well. Solder probably works a little better for generating. You should first tin the split generating pellets well with solder using plenty of flux. Next heat your tool and tin the tool edge where the pellets are placed and wipe it with a damp rag to see how well the solder has wetted. If it looks good then spread some solder paste on this edge and position the tinned half pellets around the edge evenly spaced.
Your glass blank should have a fairly flat surface to start with. If it's a molded blank then you probably should work the tool by hand first with light pressure. Otherwise you could possibly knock off a pellet. Also if it's a molded blank and not very flat you might want to lap it flat first.
If you ever have tried perforating a mirror for a Cassegrain using trepanning with loose abrasive you will appreciate how fast a diamond core drill works. I know I once spent more than one day trepanning a 2 inch thick mirror whereas with a diamond core drill you can do the same thing in minutes. You can buy diamond core drills and they work great but they also are not cheap either. I made a serviceable core drill by soldering 120 grit diamond generating pellets to a piece of copper pipe much like I made a generating tool. You need to be sure each pellet is the right radial distance and I used a piece of sheet aluminum inside the pipe to push the pellets against while soldering, the solder won't stick to the aluminum. I used a copper reducer to hold this tool when finished and made a steel mandrel to fit in the small end of the copper reducer for mounting in the drill press. You should break the tool in slowly on some scrap glass before you do a good mirror and again use plenty of water or coolant. With a drill press use the lowest speed and be careful about using too much pressure. You can loosen the solder and throw a pellet if you generate too much heat or worse you could shatter the mirror so take it easy when core drilling! Also you know that you must core a mirror from the back to within 1/8 to 1/4 inch of the surface then drill from the front side when you are ready to finish the coring. Never core all the way through from the back or you will get some nasty chips on the front surface.
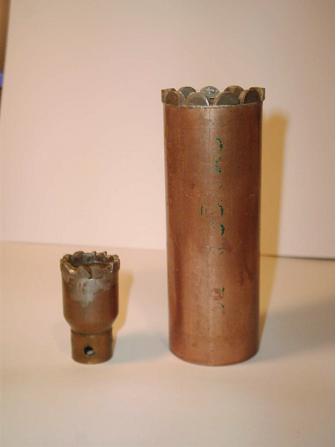
A variation on the core drill is to make a tool large enough to cut out a mirror blank from sheet glass. You can save a little money this way since it is cheaper to buy square glass. You simply make a wooden disk the size of the disk you need to cut or better yet a metal disk. Drill and tap a center hole to hold a cap screw which can be driven by a ball end allen wrench on a drill press if the drill press is large enough. Around the edge of the disk you bolt on a number of stiff metal plates (copper or brass for easy soldering) which hold a generating pellet. Be sure all the pellets are an equal distance from the center and the same height. This is a trepanning method similar to using loose abrasive. Before you start on a good piece of glass you should practice on some scrap glass first. One you are satisfied with the way it works I would recommend that you pitch the disk you made from scrap on the top as a starting guide and a piece of window glass underneath to protect the glass from chipping. You need to run this tool at a fairly slow speed and use plenty of water or coolant. Check out this web site: http://www.stargazing.net/aaa/ato/cyom_blanks.htm You can do exactly the same thing except replace the sheet metal with metal plates with the diamond pellets soldered to the edge or perhaps pieces of a diamond blade. It'll do the same thing without loose abrasive and faster.
In industry after a lens is generated it is next lapped on a diamond pellet lap to clean up the generation marks and smooth the surface so that it can be polished. Typically the diamond pellet is 10 or 12 microns. The process is very fast taking 1 to 6 minutes depending on spindle speeds! It is probably not of interest to amateurs who are making one mirror because making the pellet lap and breaking it in is more work than making a grit lap plus you need a lapping or grinding machine as well. However there may well be times when amateurs can use this technology, perhaps for flats. It is a production process for making lenses in quantity. I will describe it here in case some may want to try it.
Basically when a diamond pellet lap starts running on a generated curve the rough generated surface wears some of the pellet matrix away exposing fresh working diamonds. With adequate pressure and coolant the lap removes the scratches and sub-surface damage from generating. If the lap runs too long however the diamonds will dull and stop cutting and the lens will actually start to polish. This is bad because it will invariably get a few nasty scratches. So the process must be tuned so that the generation marks clean up before the lap stops working. Also each pellet requires a certain amount of working pressure for proper action so you must not exceed a certain number of pellets or the required force becomes too great. In addition the stroke and offset and lap size must be neutral i.e. not wanting to change the radius. It's not as complicated as it sounds.
To make a pellet lap you need a hard lap to match your lens (or mirror) curve. This can be glass or preferably metal. For steep curves it should be offset the thickness of the pellet and have 85% the diameter of the curve if it is to run on top and 20% larger if the lens (or mirror) is to run on the top. (If the lap and lens are the same size the radius can't be controlled and always goes steep.) I like to use a bronze matrix pellet with 10 to 12 micron diamond. I cut these into quarters using a cold chisel and hammer needing 6 to 8 full pellets for a 5 inch diameter tool and approximately this same density for larger tools. Ideally these pieces should be randomly scattered over the tool surface so that when the lap spins almost every pellet is at a different radius with no missing gaps. However there should be no pellet at the very center of the lap and there should pellets at the edge and evenly distributed. I tack each quarter in place with a little super glue an then when all pieces are in place and the pattern looks OK I apply a high strength epoxy around each pellet for support. The lap is then set on a hot plate to cure the thermally set epoxy for an hour and then cooled.
You need a lapping machine with a work spindle speed of at least 500 RPM for good efficiency and capable of 40? lbs. of pressure on the spindle. Next we must find a neutral stroke and offset. The stroke needs to be no more than about 1/4 of the part diameter. If you run a concave mirror on the bottom with a smaller lap on top the radius will go shorter (steeper) if the offset (average distance of spindle point to the center) is too short. If the offset is too big then the radius will increase. Conversely if a larger lap is on the bottom then the mirror will go steeper if the offset is increased too much and will go flatter if the offset is too short. Always avoid letting the spindle point stop on center at one end of its back and forth movements. A water soluble oil mixture is also necessary for pel lapping. You can likely find some at a local machine shop and it is diluted 10 to 1 with water. A re-circulating system is preferred although you can bottle feed if you have to.
First take a reading on your spherometer. Put your lap and part on the machine with a light spindle pressure, 10 lbs. Run it for only 20 seconds, that's right 20 seconds! If the pellet contact is not right the spindle point will jerk a lot. Take the lap (or part) off and look for any black mark. These marks are from one or more pellet hitting hard but sometimes it's from a high pellet or sometimes it needs a slight change in the stroke or offset. Do not continue if you have these marks or bad things will happen, (you'll lose a pellet ,glass may chip...go back to step3). If you don't find any black marks and the lap is running OK without any jerkiness then gradually increase the spindle point pressure to 30 to 40 lbs. (this depends on the number of pellets on your lap and your machine).
After running 1 to 2 minutes stop and measure the part again on the spherometer. If there is no change then all is perfect but normally the radius will go steeper or flatter and you need to change the offset to push the radius in the other direction. Only move the spindle point in increments of 1/20 of the diameter, it can be rather sensitive. After running 4 to 6 minutes total stop and look at the part. It must have an even grey appearance especially no specular reflection at an angle.(a polished look). A pell lapped surface doesn't look anything like a surface ground with loose abrasive and takes getting used to. There are many scratches running in all directions but the depth of these scratches should be uniform and there should be no digs or pits. You want to be sure all the generator marks are cleaned up. As I said before you can't continue working the same surface indefinately. If the generator marks haven't cleaned up in short order then you should squirt a 9 or 12 micron microgrit slurry on the part while running to eat away some of the pellet matrix and get some new diamonds working.
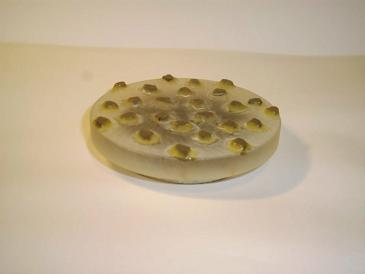
So you can see pellet lapping takes a lot of work, effort and costs to get set up running right. There is a learning curve to get used to it as well, there's a lot that you have learn on your own. Perhaps not very many ATMs will want to venture into trying it but to see a part come off a machine in minutes ready to polish is fascinating to me.
But wait a minute! Here is one more trick to try. Most of the work with pellet laps has to do with getting the diamonds worked in correctly. However if your part can go on the bottom then you can try this idea. If you cut up some metal triangles and glue a quarter pellet to each corner. Each of these pellet triangles is stoned to remove burs or excess glue then pitched on a lap with pitch behind it. As before the pattern should be as random as possible with no diamond on center. You simply press the diamonds into contact. The nice thing about a lap like this is now you can reuse the diamond pellets, it's practical for doing just one mirror and hence more useful to ATMs.
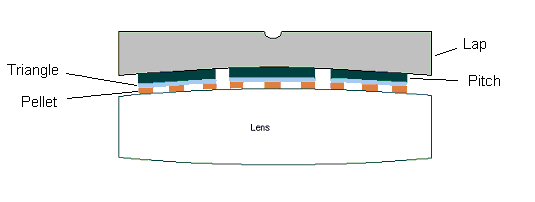
You can't make an oversize lap this way and you have to be more careful with this lap but I think it may be the most useful way for ATMs to try lapping. It does work.
Polishing with diamond is not something I recommend for ATMs. However since we are on the topic of polishing some ATMs have experimented with pellon for getting a faster polish. It's OK but a better material is urethane foam. This material has thousands of random holes to hold a charge of polish. It is harder than pellon so doesn't roll the edge so much and last much longer. You can use contact cement and glue it to your lap (if you have a solid lap). Better yet since you have to make a pitch lap anyway you can press this material down on top of your pitch lap against your mirror. I make the surface of the lap sticky with a little mineral spirits and press it for 5 or 10 minutes. When your are ready to polish with pitch or if the channels close up it will peel off the lap easily in one piece ready to use again. Cold press your pitch lap and you're ready to polish with pitch. It comes in different thicknesses, I'd recommend .020 inch and is available from Universal Photonics. Try it, you'll like it.
There are a number of makers of diamond pellets but many will not sell small quantities of pellets. I believe these companies will but am not absolutely certain.
|
Scomac Inc. 8269 Buffalo Rd. Bergen, NY 14416 www.scomac.com |
Gator Diamond Inc. 1270 Belle Ave., Suite 106 Winter Springs, FL 32708 Sales@GatorDiamond.com |
|
Universal Photonics Inc. Hicksville, NY 11801 Info@universalphotonics.com |
Copyright © 2004 Ed J.
HTML markup and layout by Mark H.