Figuring a 'Perfect' Mirror
Diagnosis of our Mirror's Problems
Choosing Mirror Testing Methods
Logging the Mirrors Figure
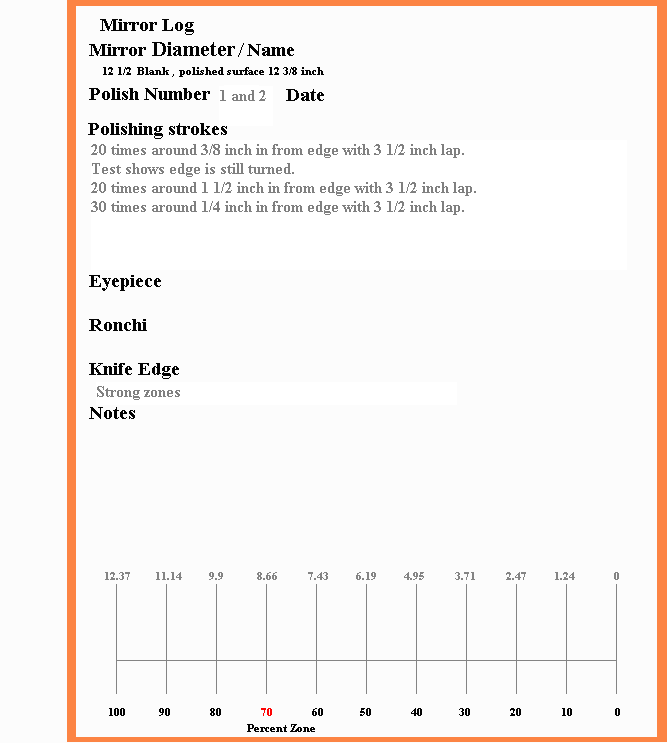
The Mirror Log
Polish 16, Full Size Lap on Top
Polish 17, Cool Mirror, Hot Day
The Sweat Band and Mirror Polishing Temperature
Polish 18 and 19, The "I" Stroke or Oblating Stroke
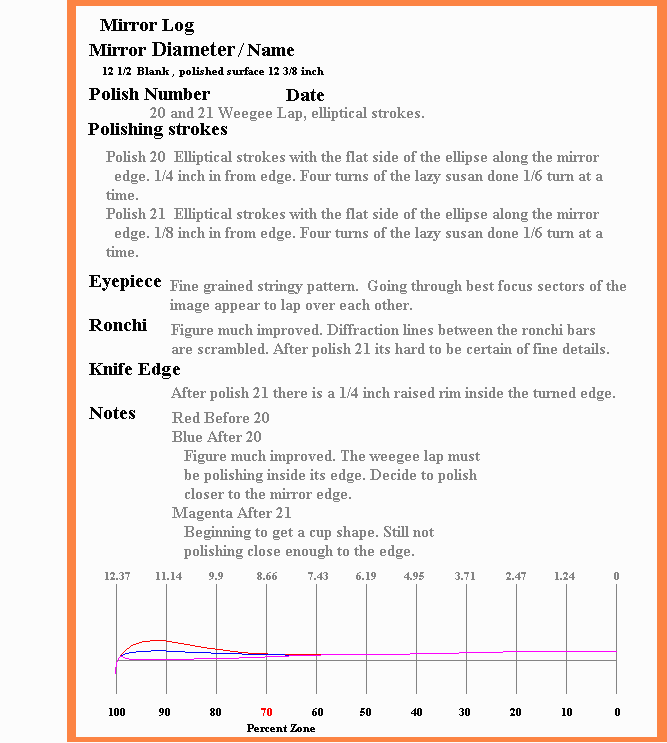
Polish 20, 21 and 22, The Weegee Lap
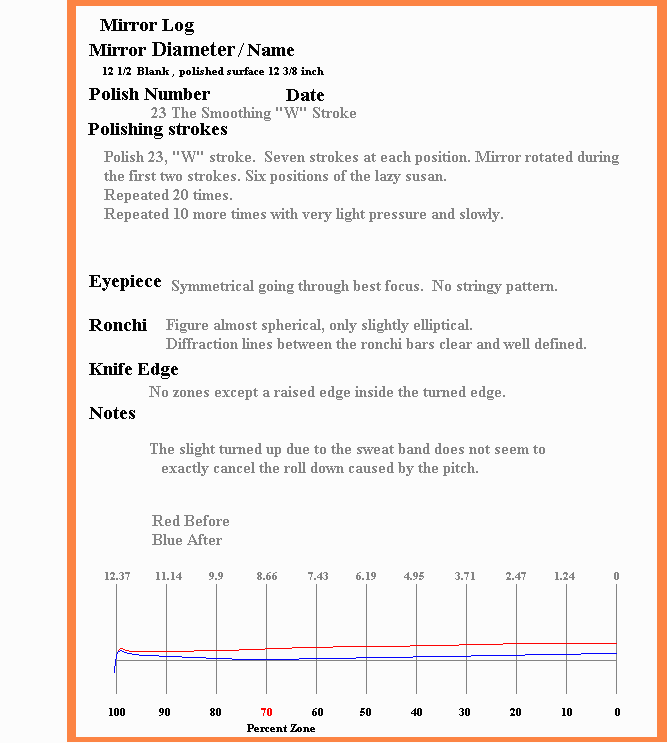
Polish 23, The Smoothing "W" Stroke
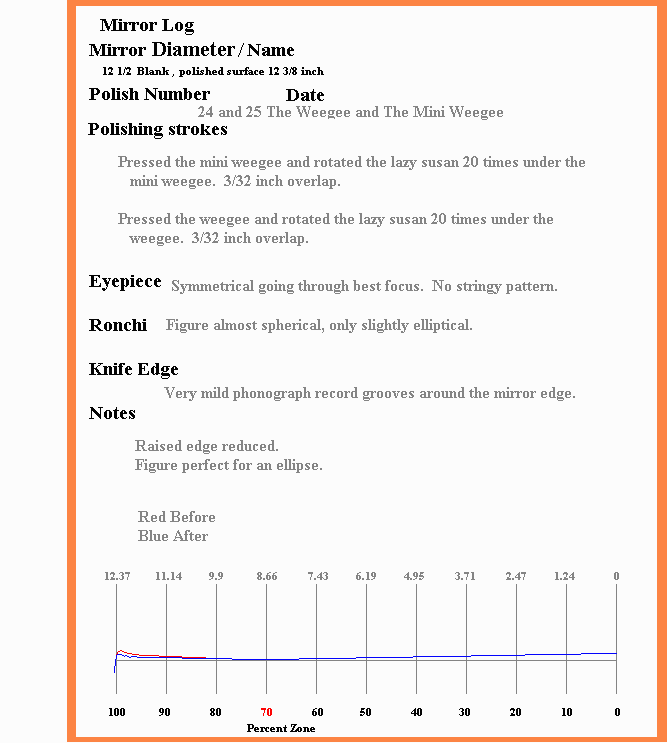
Polish 24 and 25, The Weegee Lap and the Mini Weegee
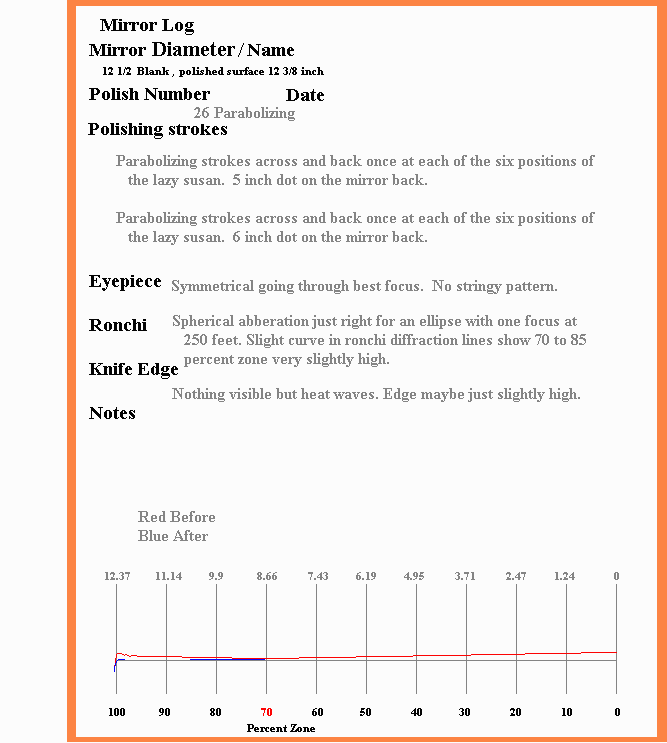
Polish 26, The Parabolizing Stroke
Prescriptions
Smoothing Without Doing Much Else
Rework of a Partially Completed 17.5 inch Mirror
Figuring a 'Perfect' Mirror
Well, nothing is ever perfect but we plan to polish our 30 year old mirror until the mirror figure is better than can be used under most seeing conditions. We feel that we will be unable to interpret the curved ronchi patterns produced when testing at the center of curvature without attaining a greater level of skill than we have time to acquire. Other options: Testing with an optical flat, probably the best option but way beyond our budget. It is possible to place a small plano convex lens in front of the grating to straighten the curved ronchi patterns. Star testing would be good but since we want a mirror better than the usual seeing we would need to pick our nights, the other problem is that the star is too dim with an uncoated mirror and we are trying to see very subtle shadows. That brings us back to the test suggested in alt_12. When the convex mirror is set at 103 feet as suggested by the formula we can still see a bit of spherical aberration as compared with the same test on Venus. So we will more than double the distance to the convex mirror but this makes the light of the laser pointer too dim and doubles the turbulent air the light must traverse. I wanted to keep things simple and cheap but I'm running out of options. A good possibility is a light emitting diode. The new Agilent Technology LED's used in traffic lights are very bright and very efficient. If I had a flag pole to run a light bulb up onto that might be a way to go. What I already have is the automotive mirror 80 feet up in a redwood tree in a location that is not easily accessible. A friend has offered to loan me a 30 times more powerful laser so this will be the answer. The laser produces monochromatic red light which makes the diffraction lines of the ronchi and eyepiece tests very visible. So far as the turbulence there are bad nights and good nights but if the telescope is cooled to ambient well before testing and we spend some time testing we can work through the turbulence on most nights. Need I say: CAUTION, laser light causes eye damage?
Diagnosis of our Mirror's Problems
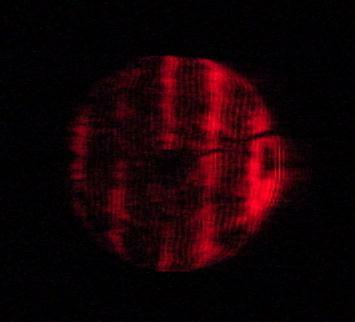
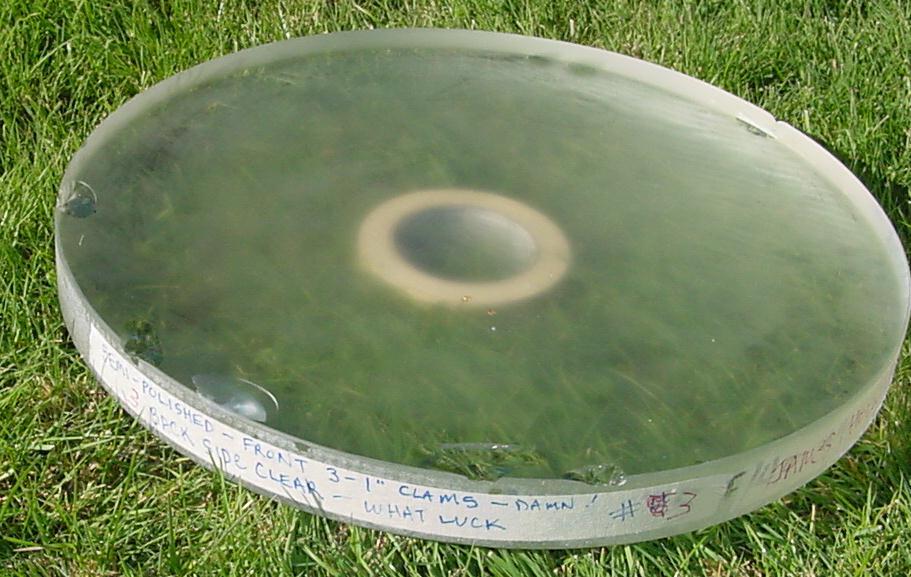
After 30 years and three coatings and de-coatings the mirror figure is the same but it no longer has that proverbial 'polished brass' brightness. The fine grinding haze was polished out years ago, there are a few scratches from some contaminated rouge we used years ago. We plan to ignore the scratches but as it turns out by the time we finish about half of them have been polished out. Another thing we have noticed when star testing with a knife edge is a slight mottled appearance often called 'Dog Biscuit'. Dog Biscuit is a slight bumpiness due to uneven polishing. Careful examination of the ronchi gram of Venus shows that besides the turned down edge there is a slight high zone at 80 percent. And finally while we were trying the eyepiece test for turned edge we noticed a stringy pattern of light. Outside of focus the stringy light extended into the dark shadow of the diagonal. Inside of focus the stringy light was radiating outward from the out of focus disk.
How did I miss the turned edge when correcting the mirror with the rose lap years ago? Well I used only the Foucault test measuring the difference between the focal distance of the mirror center, the 70 percent zone and the 90 percent zone. The numbers came out right and I presumed it was the best I could do.
Choosing Mirror Testing Methods
Testing Method Advantage Disadvantage Ronchi Screen Test At the center of curvature Very easy to see and understand zonal and turned edge defects. Out of the weather. Light travels a shorter distance through turbulent air. Requires a degree of skill and understanding to interpret spherical aberration. Poor at showing asymmetric problems such as astigmatism. Using an artificial star When the mirror is right the ronchi lines are straight. Can draw straight marker pin lines on the mirror for comparison. Initial testing can be done with the suns reflection from a power pole insulator. Final testing is outside after dark. Poor at showing asymmetric problems such as astigmatism. Knife Edge Test At the center of curvature More sensitive than the ronchi screen test. Good at showing zonal defects. Allows measurement of the radius of curvature at various zones. Out of the weather, less thermal problems. Requires some equipment to measure the distance between the foci. Harder to see turned edge than when using the ronchi screen test. Poor at showing asymmetric problems such as astigmatism. Using an artificial star Since the entire mirror will gray evenly when the mirror is just right this is our most sensitive test. Final testing is outside after dark. Poor at showing asymmetric problems such as astigmatism. Extremely sensitive to movement of the artificial star or the telescope. Requires patience. The Eyepiece Test Picks up asymmetric errors such as astigmatism easily. Requires no special equipment just the telescope itself. Tests the entire optical system of the telescope. Must be done after dark with the telescope and an artificial star. Much easier to tell there is a problem than to tell what to do about the problem. Testing with an artificial star the mirror appears twice as big since you view the mirror from the focus instead of the center of curvature.
We will be testing using the artificial star outside every night after polishing the mirror. We will use the eyepiece test, the ronchi screen test and the knife edge test. These tests will do the job.
We have a known good diagonal in the telescope. If you experience asymmetric problems while testing make an index line on the mirror and rotate the mirror to see if the problem rotates with the index line or remains stationary with the diagonal. With reasonable care asymmetric mirrors are very rare. Sometimes people do a bit of polishing with the lap on top at the very end of polishing and forget to rotate the mirror which is then on the bottom. Best to do an eyepiece test in your telescope before sending the mirror off for coating.
Logging the Mirrors Figure
The Reference Sphere or Parabola
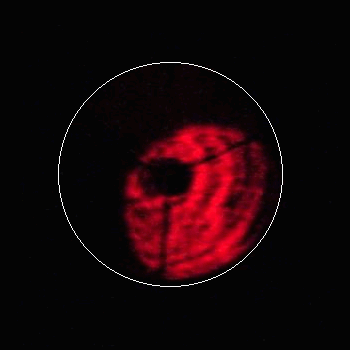
You have by now seen a few photographs of foucault patterns. Picture; Picture. The apparent hills and valleys give one some grasp of the general figure of the mirror. I have given up trying to derive this information from the eyepiece test so I will use the foucault and ronchi tests for zonal information and use the eyepiece test to look for astigmatism and other asymmetry and the stringy patterns caused by ripples.
Mirror Polisher's Log
I made these polishing log sheets to record a record of my polishing progress. Originally the log was to help me later tell about polishing but as it turned out I occasionally referred to past pages to get the same polishing results as previously. If you would like to use this log you can open the mir-log.gif file with Microsoft Paint Brush, change it as you please and print it.
Polish 1 and 2
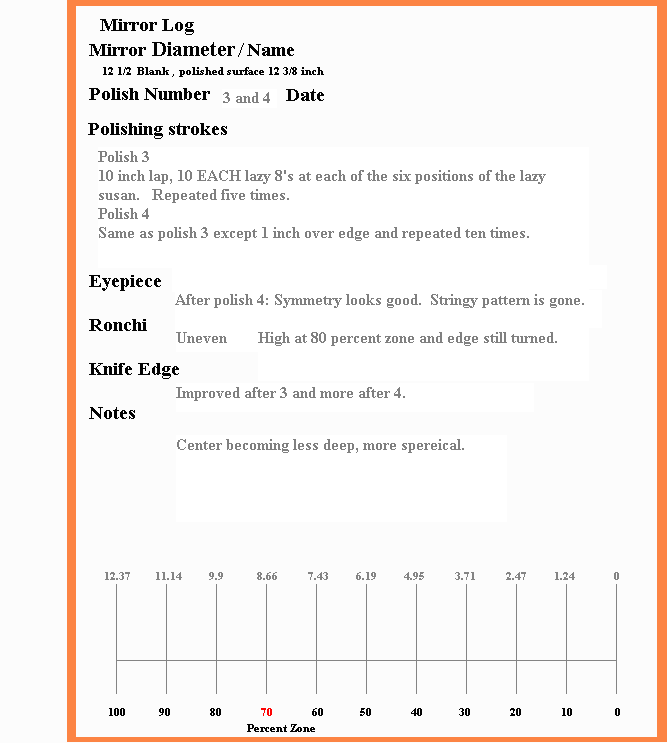
Polish 3 and 4
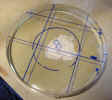
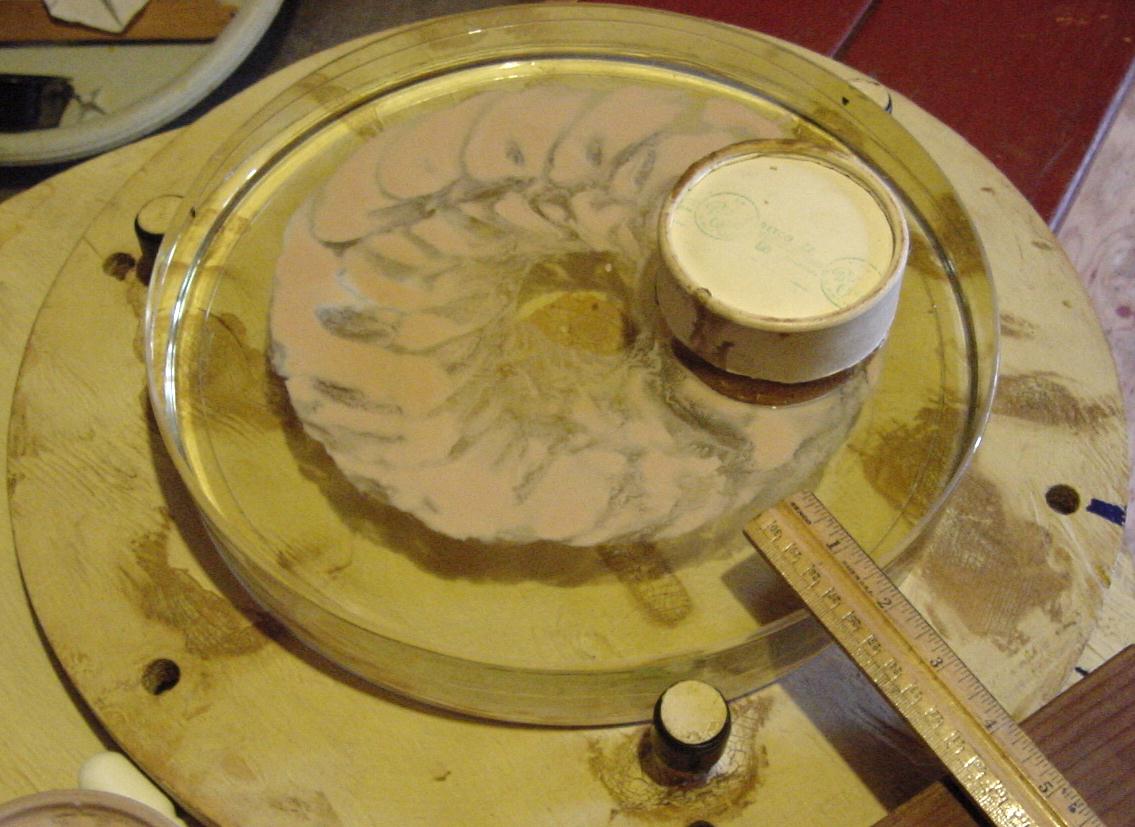
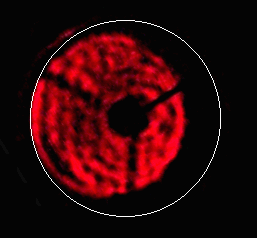
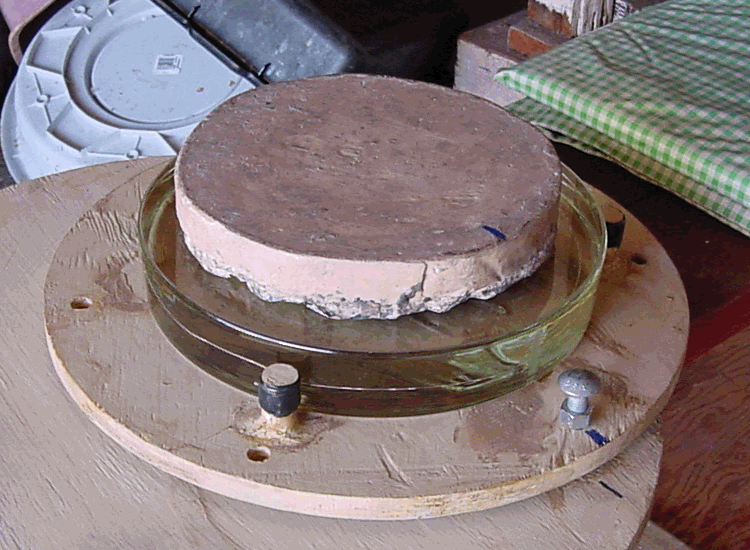
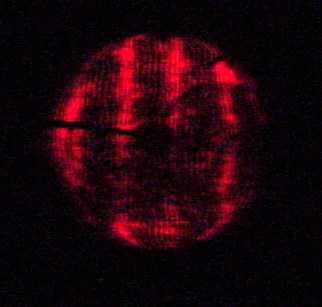
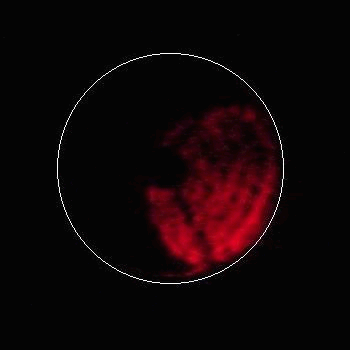
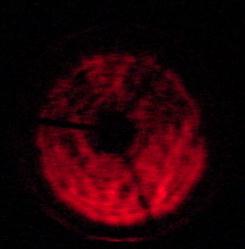
We looked at the 30 year old full size pitch lap and it was in no condition to be used. We also noted that the old pitch lap is 1/16 inch larger than the polished face of the mirror which undoubtedly accounts for the badly turned edge. A friend loaned me this 10 inch pitch lap and I heavy pressed and trimmed it. After trimming we cleaned the loose pitch and pressed a bit more. We then invented our 'lazy 8' stroke as per the animation to smooth the surface. It does smooth the groves of the 3 1/2 inch polisher but does little to improve the figure. ( Don't worry, there was CeO water on the mirror when we actually polished. ) After polish 3. The narrow red diffraction lines that are normally between the red ronchi bars are jumbled. After polish 3. The knife edge test is best at showing the zoning caused by the 3 1/2 inch tool. Here is the log for polish 3 and 4. After polish 4. The long bright bar shows we have a high zone at 80 or 90 percent. Much of the irregularities of the bars is due to turbulence so you can't really read a mirror from a snap shot. You need to observe for a while to see which artifacts are actually on the mirror. Using the ronchi test outside of focus clearly shows a turned down edge in the outer 1/4 inch of the mirror. Outside of focus the lines turn outward at the edge instead of inward as shown here.
We are able to rotate the ronchi screen or knife edge 90 degrees on the eyepiece tube to test for asymmetry but we have never learned much useful from this ability. Asymmetry is much easier to pickup with the eyepiece test.After polish 4. The zones made by the 3 1/2 inch tool are still visible but greatly faded. The small 12 VDC exhaust fan is very useful for preparing the telescope for test. We have an in line fuse in the clip lead and clip it to the car battery. Preferably we put the telescope in the shade and start the fan an hour before dark. We let the fan run as we test and this causes some fast turbulence. Near the end of test we disconnect the fan and let the turbulence settle. On a hot day the side walks and the telescope may not yet have cooled enough. With three ronchi lines showing sometimes the bar above the diagonal will split momentarily. Sometimes the narrow diffraction lines between the ronchi lines will go from straight to curved as you watch. Polish 5 and 6
Well, the figure may not be right but the polish is great.( No, its not an earthquake.) We give the rose lap one more try but the stringy pattern returns. And here is the log page. After polish 5. The knife edge test no longer shows the zones caused by the 3 1/2 inch lap. Polish 7 through 14
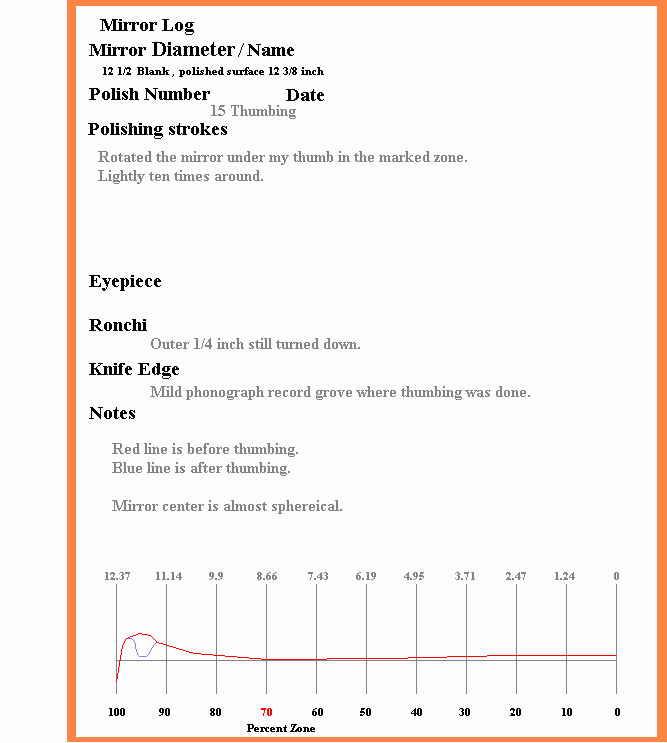
We did some lazy 8's with the 10 inch lap and the stringy pattern disappeared quickly. We tried various combinations of under size laps with little success at getting control of the mirror figure so parabolizing with an under size lap will have to wait for a future edition. ( For some advise on parabolizing with an undersize lap refer to the topic at the bottom of this page. ) Eventually we became aware that although the mirror edge from 1/4 inch from the edge to 1/2 inch from the edge was under our control the outer 1/8 inch of the mirror was very turned down. To reduce the turned edge without producing the zones of the 3 1/2 inch lap we worked with the 10 inch lap on top and scrubbed around the mirror just inside the edge. This produced a high rim just inside the edge that we decided to thumb.
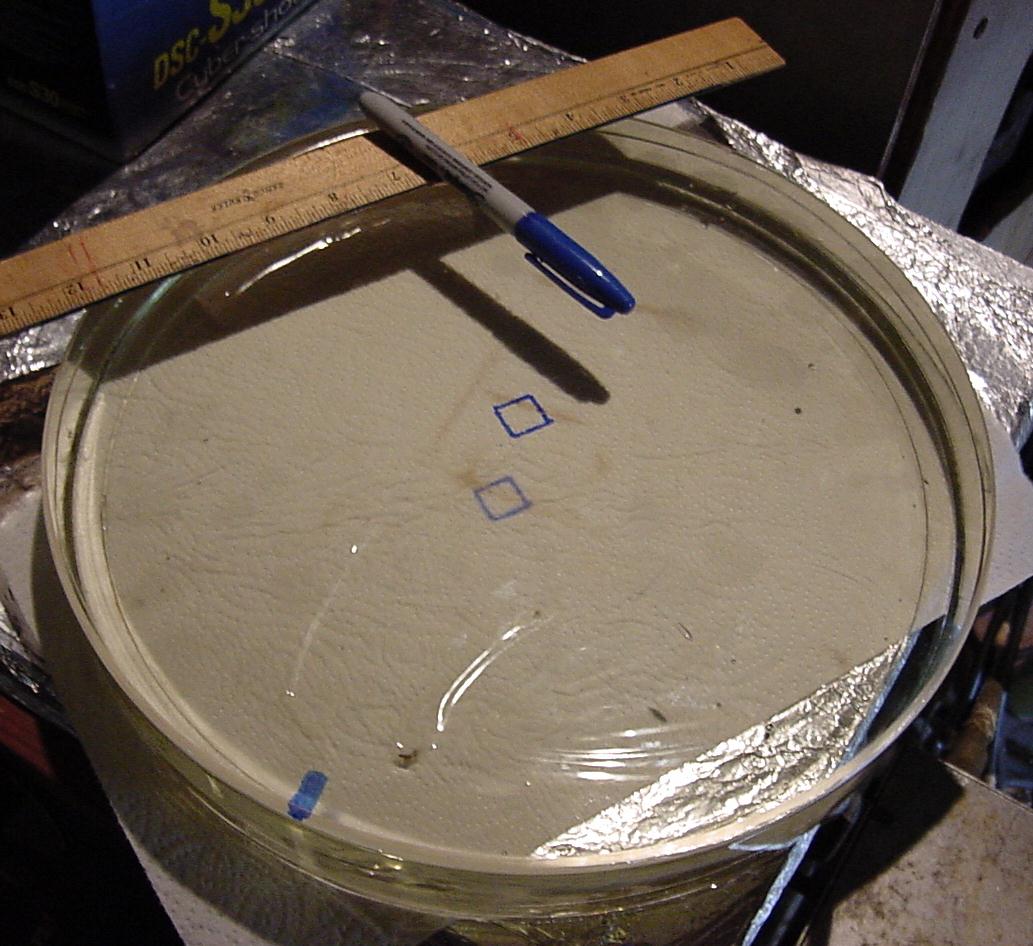
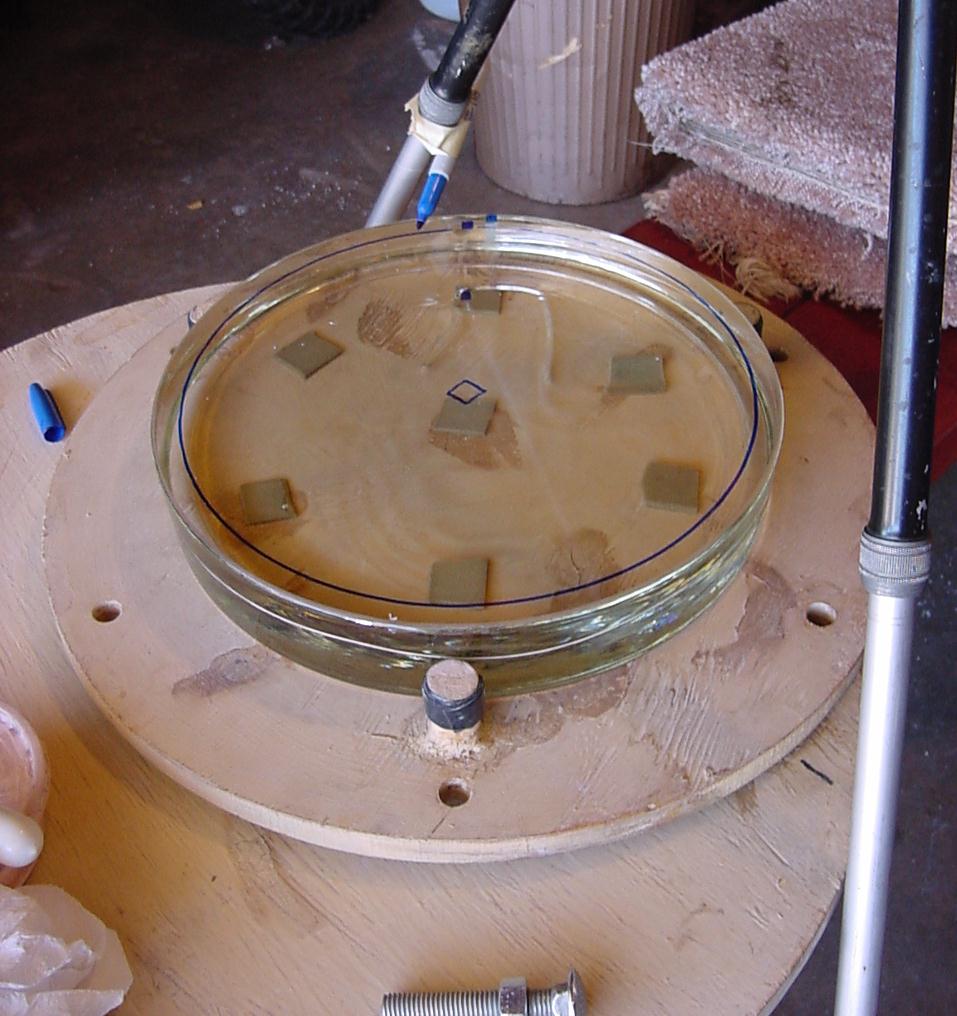
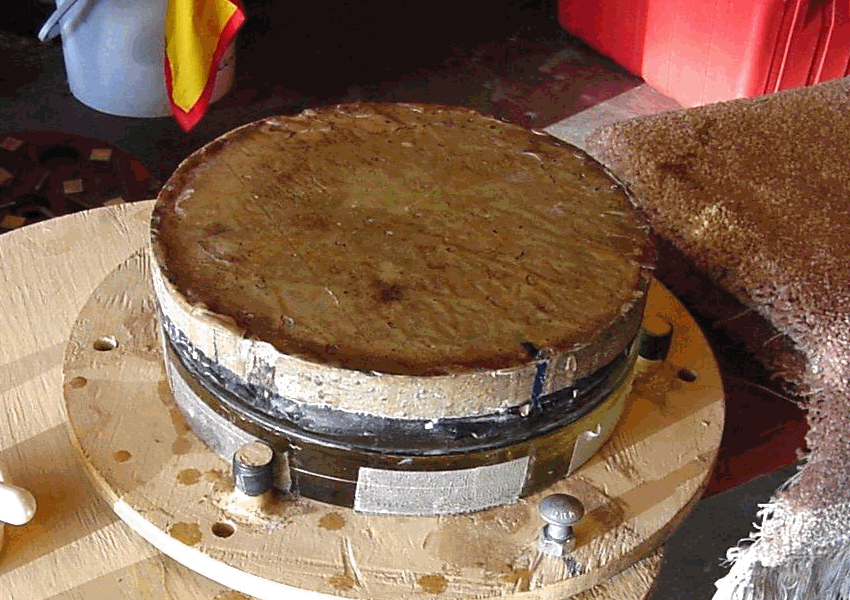
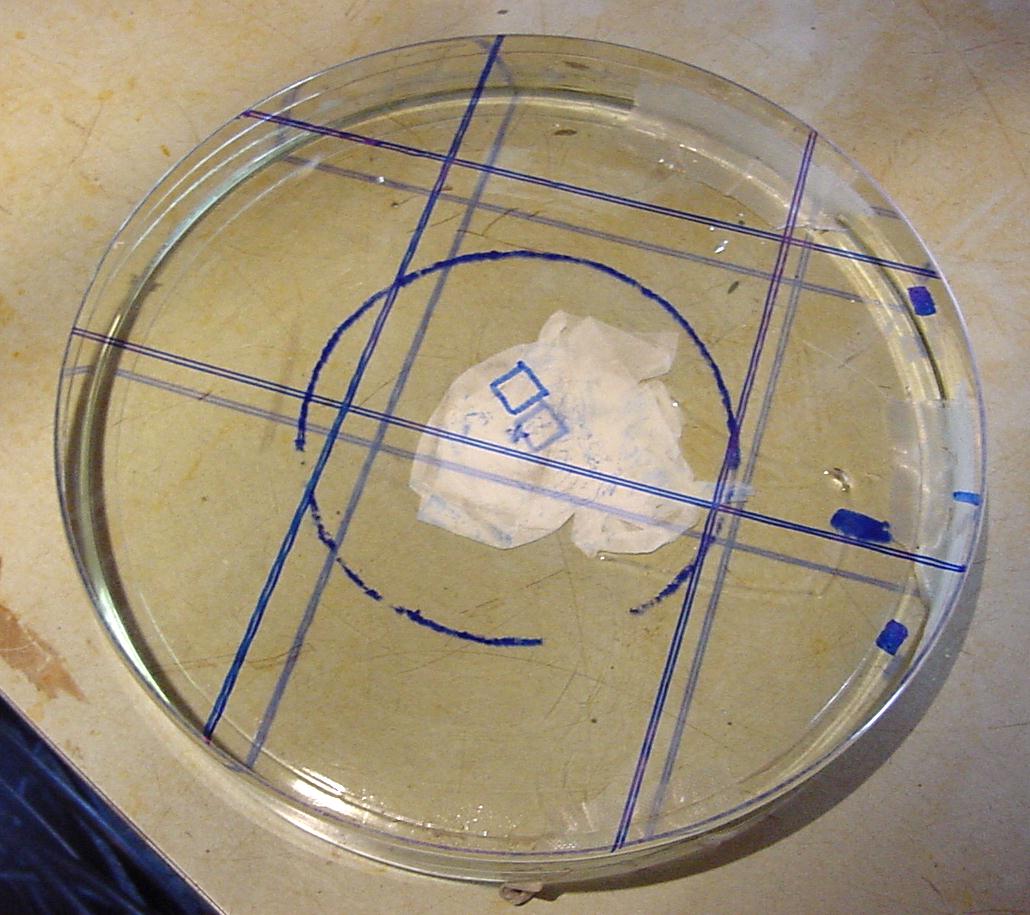
The squares made with the felt tip pin at the mirror edge are to determine the exact location of the high zone during mirror test. The squares need to be at least 1/4 x 1/4 inch to see while testing. We use the lazy Susan under the mirror to mark just outside the zone that is to be thumbed. We rotate the mirror under our thumb. Both I and the people at the Telescope Makers Workshop do not recommend thumbing with a scrubbing action. To be precise they don't like thumbing period. If you thumb hard in the wrong place twice around you can add another 1 1/2 hours of polishing with the full size lap. Polish 15 Log. Time is getting by and we have a star party promised for next month. We head to the Chabot Space and Science Center, Telescope Makers Workshop for advice. They tell me I will need a full size lap. So I buy a 12 1/2 inch grinding tool and we pour a pitch lap on the grinding tool. They read the mirror and tell me an F6 mirror won't be hard to parabolize. Testing with the knife edge at the center of curvature they see the mirror has almost no shadows in the center indicating that it is nearly spherical. They tell me to reduce the grooves at the edge faster I should polish with the lap on top.
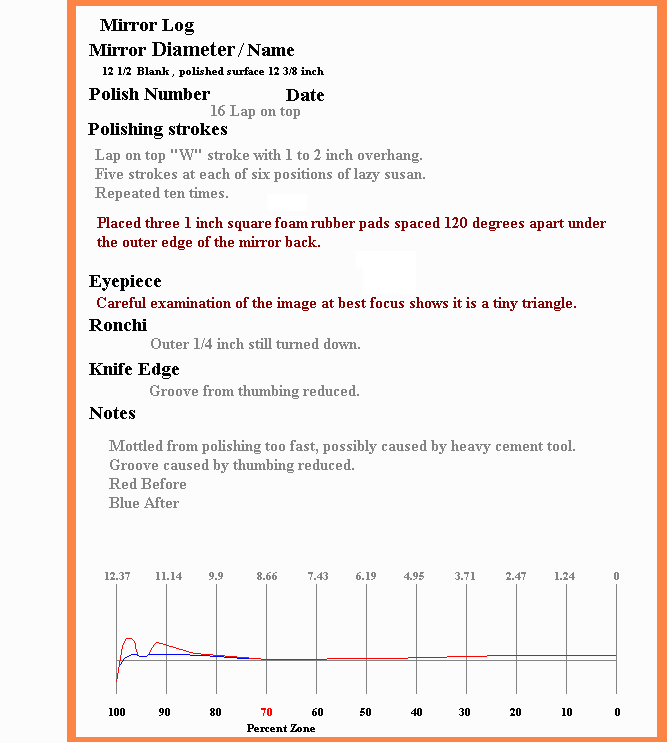
Polish 16, Full Size Lap on Top
Polishing with the mirror on top removes glass mostly from the mirror center. To get more action at the edge we will polish with the lap on top. We polish lightly keeping the push on the lap on the side of the lap to avoid turning the mirror edge. I recommend warming the mirror and using a sweat band around the mirror edge. The mirror is now on the bottom, don't forget to rotate the mirror. Since the original version of this program we have learned a bit more about polishing lap on top. It seems that lap on top polishing with short strokes actually shortens the mirror radius. ( Grinding tool on top lengthens mirror radius. )
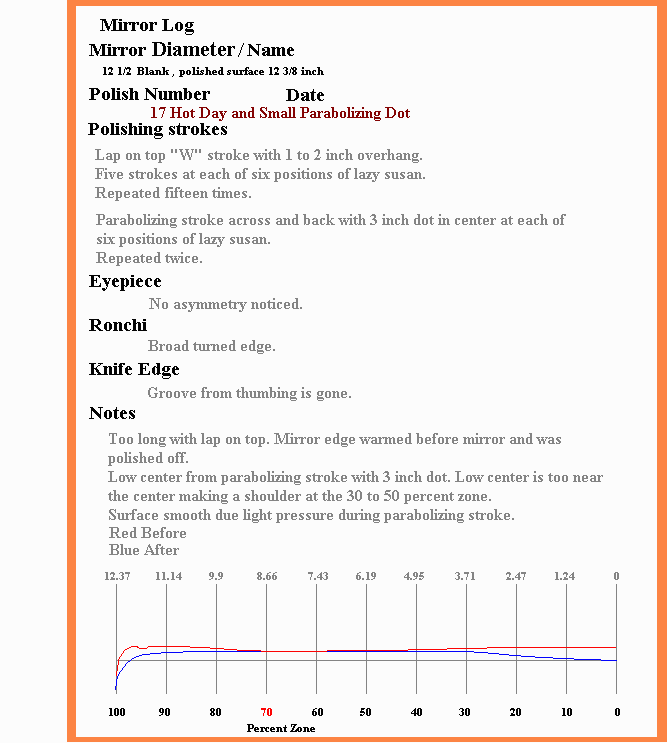
If the lap on top strokes are lengthened the edge begins to turn down outside of the 80 percent zone. That being relative to the overall shortening. See: pitchlap.htmBefore putting the lap on top rinse it off in a plastic pan. Polish 16 Log. Polish 17, Cool Mirror Hot Day
It was a cool night and the mirror is cool. I'm running late so decide to skip the hot press. By the time I get going with the lap on top it is warming through 85F towards 90F. I just learned about the parabolizing stroke so decide to try it out using a 3 inch dot. Polish 17 Log, things did not go right. The Sweat Band and Mirror Polishing Temperature
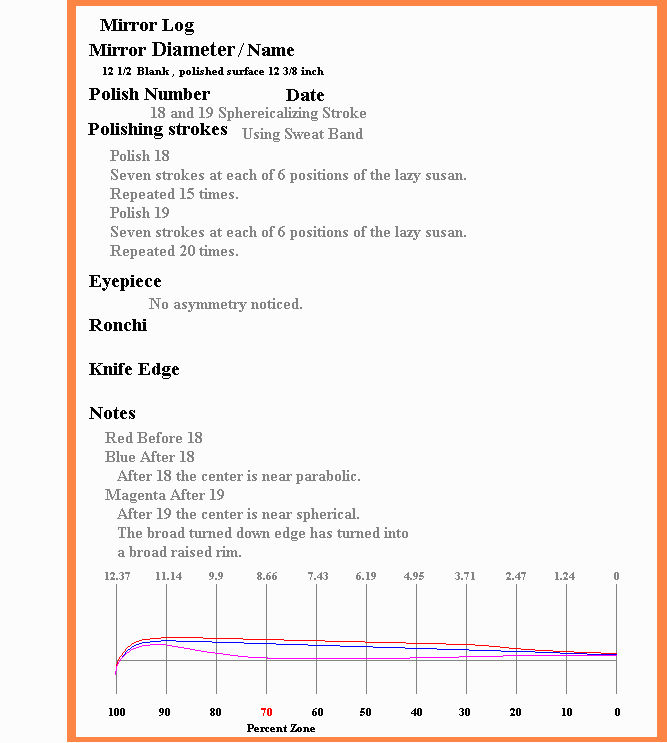
Polish 18 and 19, The "I" Stroke or Oblating Stroke
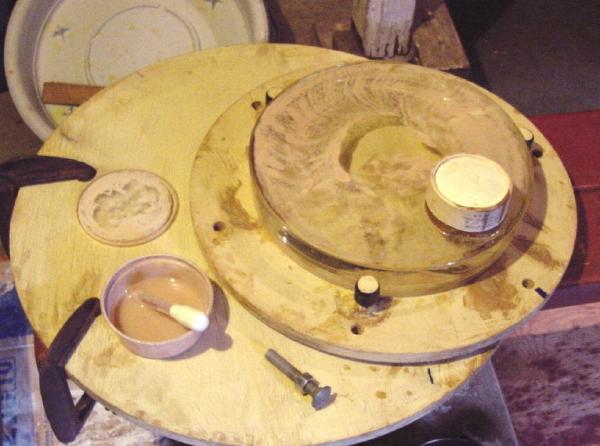
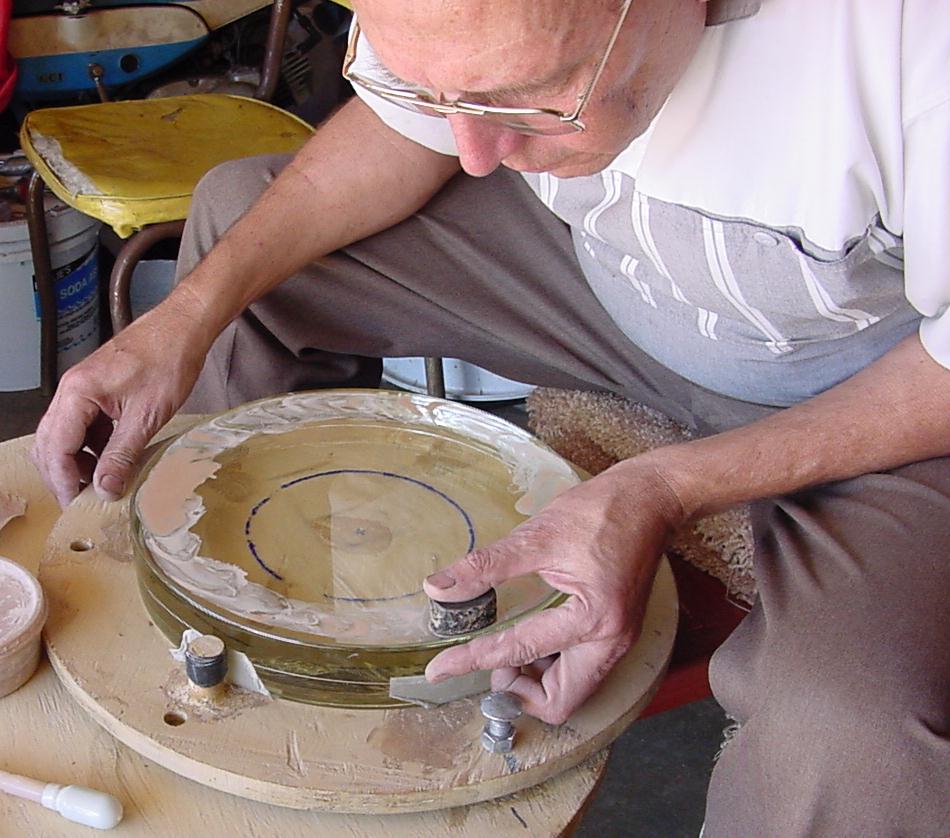
Polish 20, 21 and 22, The Weegee Lap
Before doing any under size polishing you need to know exactly where to polish. Guessing can cost hours. Since we are going to polish near the edge we have marked the edge so during test we have a reference. After testing we log exactly where the high zone is located. 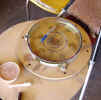
We have made a circle with a marker pin mark using the lazy susan just outside of the zone we wish to polish. 
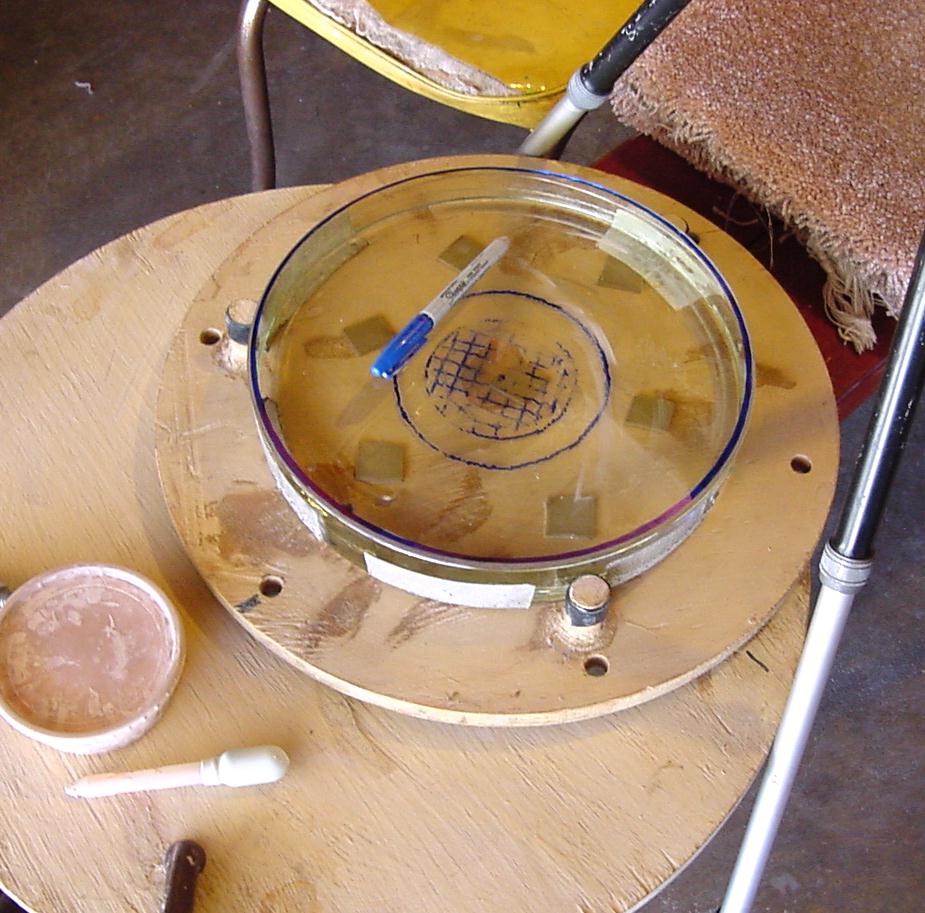
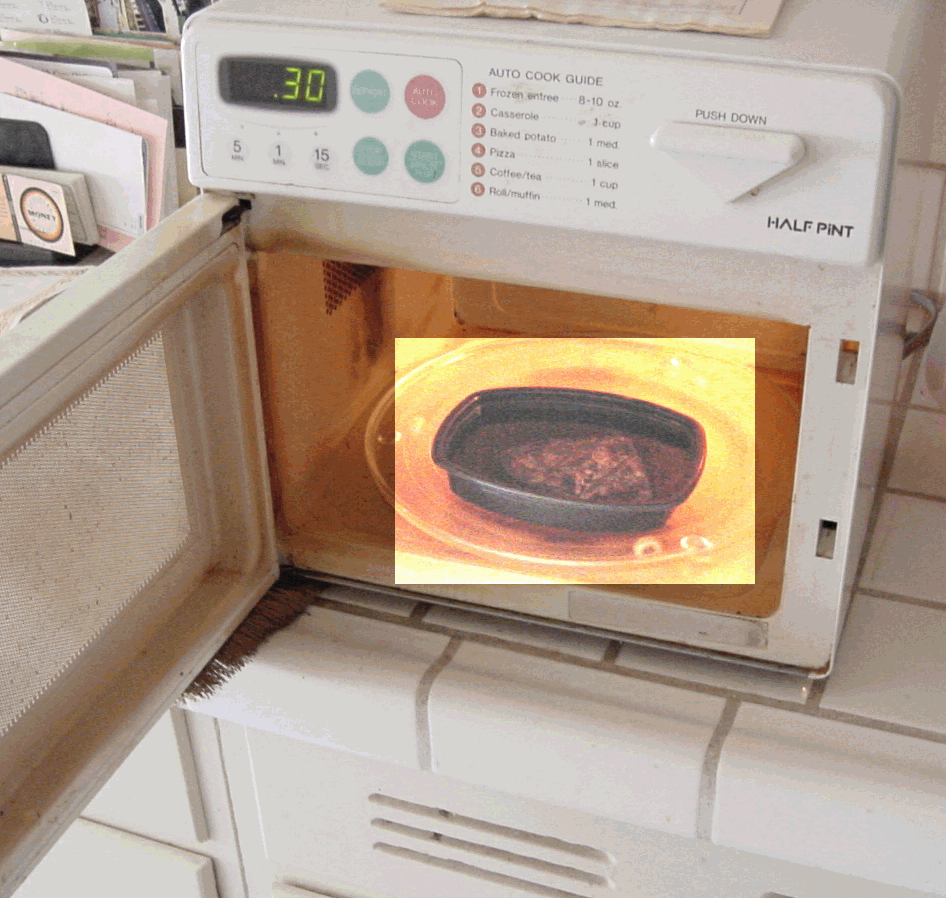
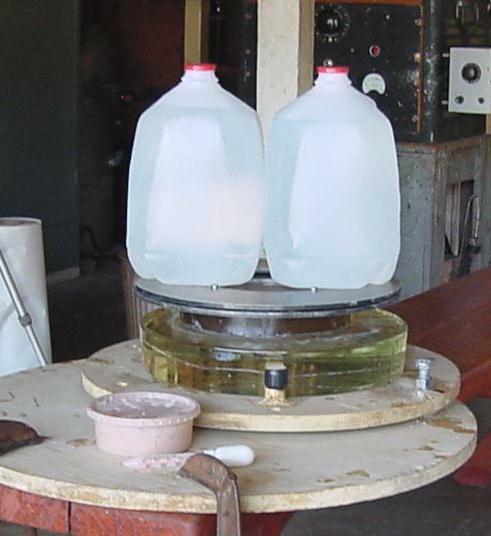
We heat the weegee lap in the microwave. 30 seconds is really too long, 15 seconds is about right. If it gets too hot dump it out on a plastic bag right away and you can probably save it. 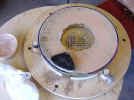
Polish 20 and 21. The stroke is an ellipse with the broad side of the weegee lap traveling along our marker pin line for a ways then circling back for the next stroke. We do 1/6 of the mirror then re-index the lazy susan. With the small, soft lap it won't take much pressure or it will grab. Next time we may make the weegee a little thicker because the heat from our fingers will soften it. 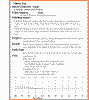
Polish 20 and 21 Log. 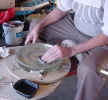
Polish 22. We worked a bit long with the weegee and made a cupped figure. Here we polish on the inner edge of the cupping. The weegee lap with its wings makes far less zoning than the round lap plus we have learned how long to polish before testing. Ripple Even careful polishing with the weegee lap will produce a fine symmetrical stringy pattern so we will need to do some smoothing before testing the mirror. Polish 23, The Smoothing "W" Stroke
We will use this polishing stroke often since it will smooth the mirror without changing the figure at least on mirrors longer focal length than F6. First we do a light press. If the press is not done the mirror will show a mottled pattern under the foucault test. We almost always use a sweat band with this stroke since cooling the edge will almost cancel the natural tendency of the pitch to roll the mirror edge. 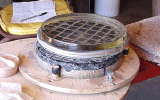
And here is the "W" stroke. The animation shows five strokes with the mirror then rotated center over center on the pitch lap. For better smoothing results use seven strokes and rotate the mirror during the first two push strokes. The facets at the pitch lap edge are sometimes ragged and leave slight tracks when the mirror is rotated center over center. A typical session: Seven strokes at each of the six positions of the lazy susan. Repeated 20 times followed by 10 more done while lifting the lap slightly. You can put double side rug tape on the mirror edge so you can lift the mirror slightly while polishing. If the last 10 are done slowly and lightly you can produce a super smooth surface. 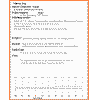
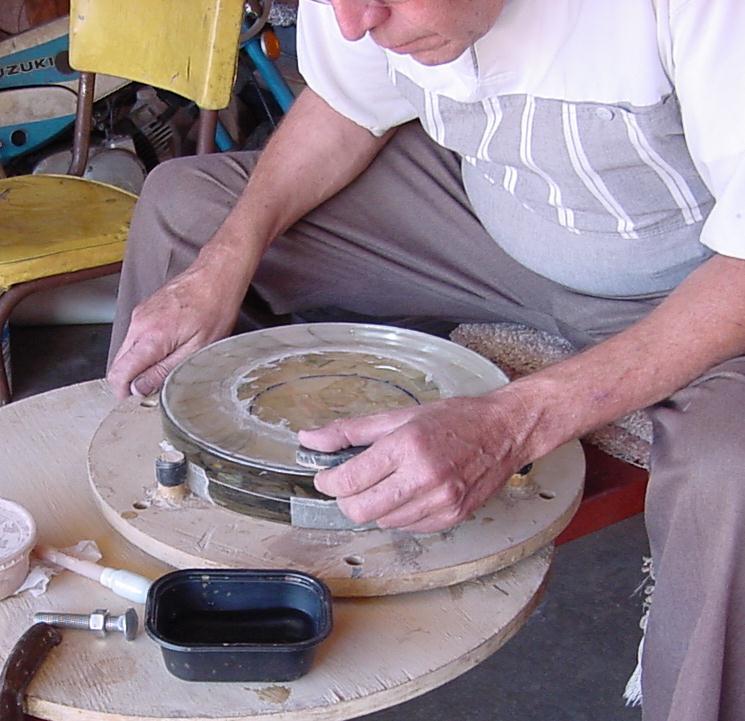
Polish 23 Log Polish 24 and 25, The Weegee Lap and the Mini Weegee
We heat the weegee lap or mini weegee in the microwave in a frozen food dish with water. 30 seconds is really too long, 15 seconds is about right. If it gets too hot dump it out on a plastic bag right away and you can probably save it. 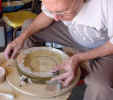
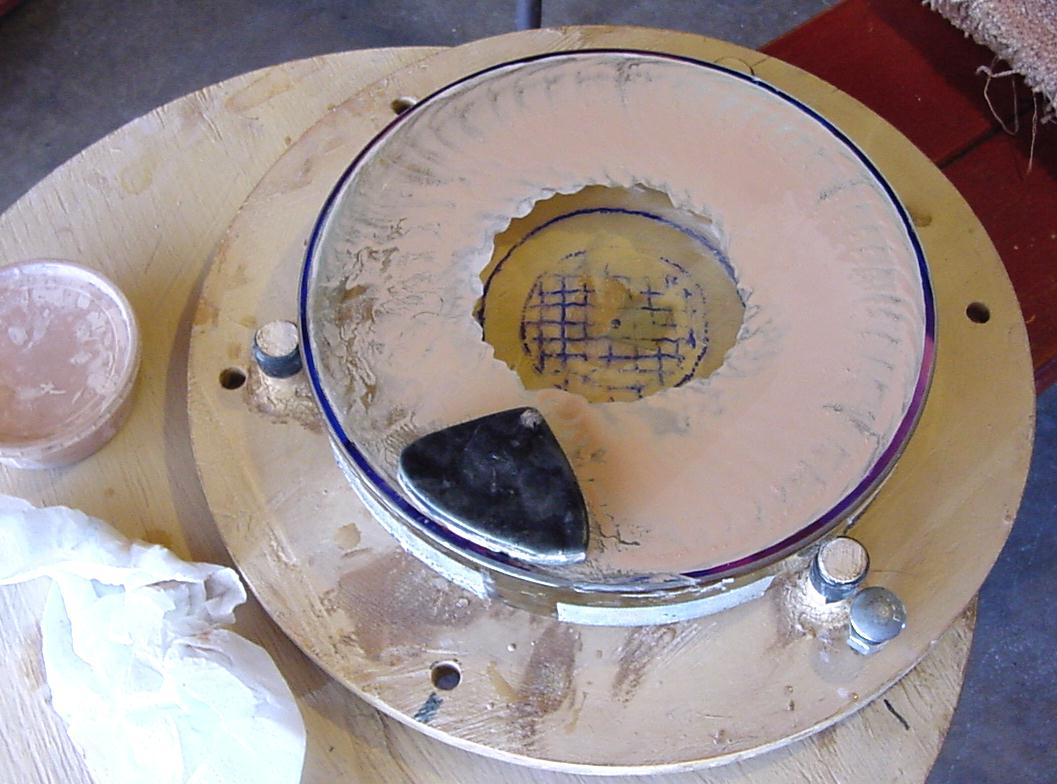
Here we use the mini weegee lap. The lap is so small it requires almost no pressure. I rotate the lazy susan 20 rotations under the mini weegee lap. Since we found that these small laps actually polish about 1/8 inch inside their edge we actually go around with the lap edge 3/32 outside the polished surface. You will need to press the mini weegee further in on the polished surface. Polishing this way will make a zone but you can work on a narrow turned edge with the mini weegee. 
Here we use the weegee lap. I rotate the lazy susan 20 rotations under the weegee lap. The lap is rather thin and soft so I try to spread the pressure evenly with my thumb. Since we found that these small laps actually polish about 1/8 inch inside their edge we actually go around with the lap edge 3/32 outside the polished surface. You will need to press the mini weegee further in on the polished surface. 
Polish 24 and 25 Log Polish 26, The Parabolizing Stroke
First we do a light press. 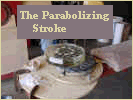
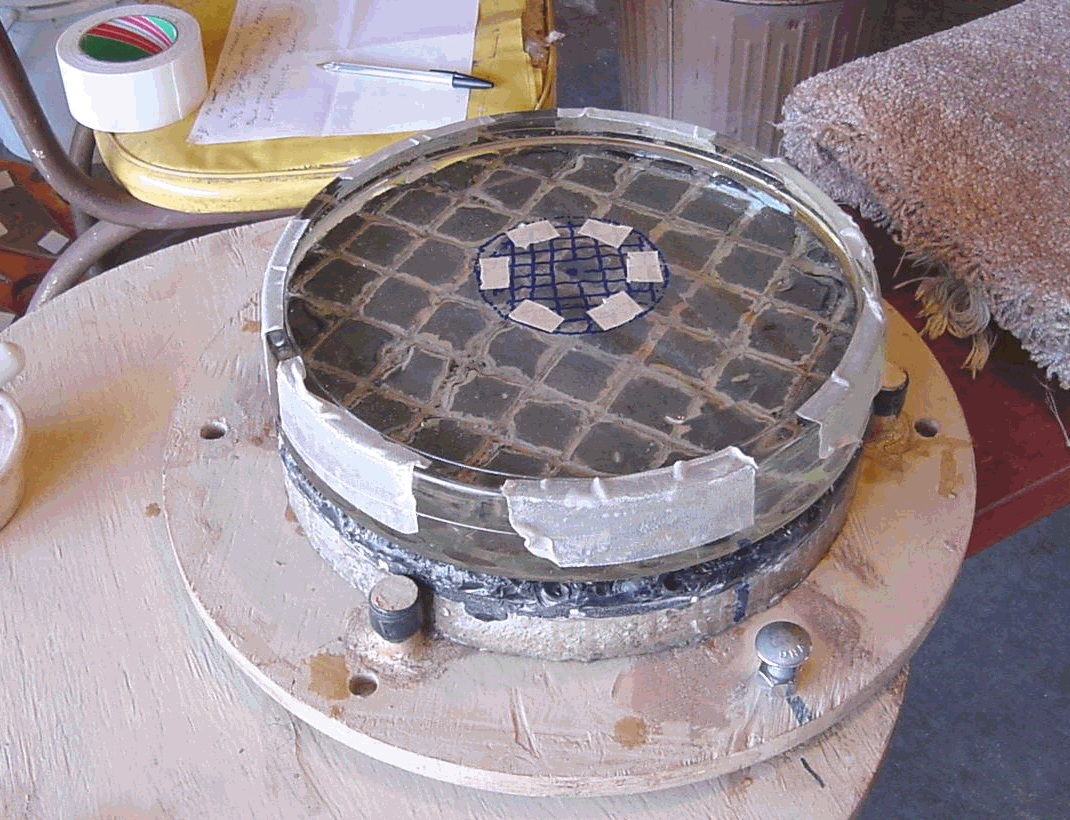
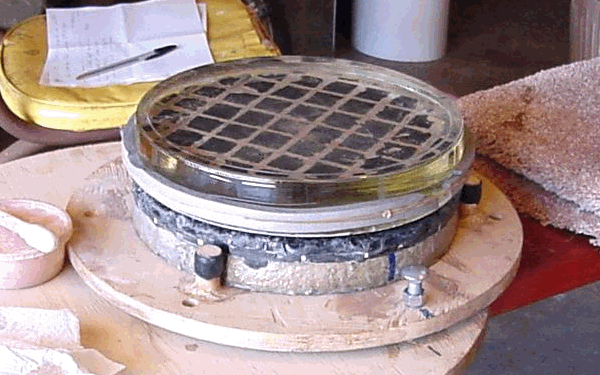
The Parabolizing Stroke The Tic Tac Toe lines are for comparison with the diffraction lines that are visible between the ronchi bars. A single marker pin line is hard to see. You need a line about 3/16 inch wide. The lines cause diffraction worse than spider diffraction. If you use lines in only one direction you will see a type of asymmetry in the eyepiece test. 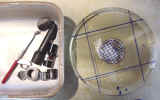
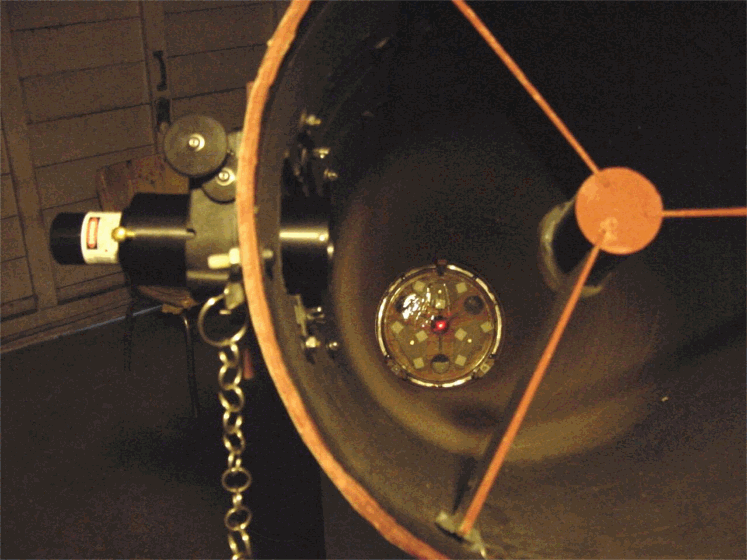
We keep the testing equipment together for quick use. The laser goes into the 2 inch to 1 1/4 adapter. With the flashlight we can see the square in the mirror center while adjusting the spider. With the mechanics mirror we can see the face of the diagonal while adjusting the mirror cell. The barrel is unscrewed from the eyepiece for use with either the ronchi screen or the knife edge. We also need our prescription glasses. When testing arrange a good place to sit so your head is vertical. Polish 26 Log Polish 27 Log, A Combination Stroke
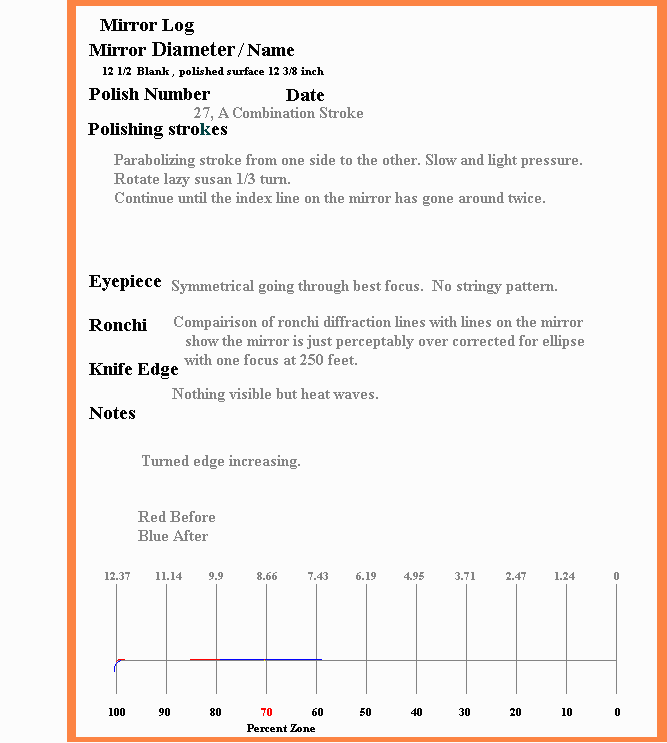
The ronchi lines are straight except for a slight high zone at 80 percent. So we do a parabolizing stroke with a 7 inch circle in the center of the back of the mirror. We have an index line on the back of the mirror and we polish from one side to the other slowly while lifting the mirror. We rotate the lazy susan 1/3 rotation in the same direction as the mirror rotates and repeat. We continue until the index line on the mirror has gone around twice. 
Five bars, inside of focus. A look at these animated .gif show why it takes a half hour to read the mirror. We are trying to make a mirror that is better than the average seeing will allow. 
Three bars, inside of focus. At three bars its even more sensitive. 
Polish 27 Log, Time to give it up unless we want to spend another two weeks on it. Is it over corrected or under corrected? If you can't tell for sure best to err on the under corrected side. Most mirror cells allow better air circulation on the mirror face than on the mirror back so as the night air cools the mirror will deform towards over correction. Summary of Figuring
The final bit of figuring will involve the "W" stroke and the parabolizing stroke. When it doesn't work out we back off with the "I" stroke and try again. If you make it in less than three tries you are lucky. Most telescope making instructors won't recommend the weegee lap because if it is not used carefully you can add more days to the project.
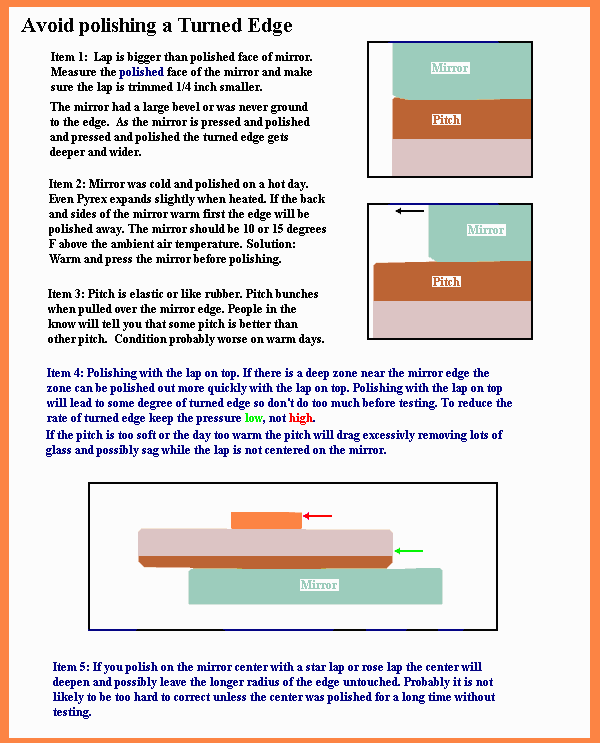
Masking the Mirror Edge

After the mirror has been coated we use the lazy susan to mask off the outer 3/32 inch at the edge. We could figure the next larger size mirror before we could get that last 3/32 inch at the edge.
Prescriptions
Parabolizing is done with a full size lap and the parabolizing stroke or with a specially made star lap or a star lap pressed from the full size lap.
Short strokes with the mirror on top center over center, "I" strokes, will eventually result in an edge that is higher than a sphere and a center that is flatter than a sphere, sometimes called an oblate mirror. Make sure the lap is trimmed 1/4 inch smaller than the polished mirror surface. Since this method is likely to produce slight zones you will need to under correct the mirror with the "I" stroke and then follow with some amount of parabolizing stroke.
Smoothing Without Doing Much Else
This is the "W" stroke. The "W" spreads the pattern of the pitch lap facets. On a 10 inch mirror 1 1/2 to 2 inches mirror over hang would be about right. Try to overhang a bit more on one side to reduce zoning. Use light pressure. If you want a very smooth surface put rug tape around the mirror edge and lift up while polishing being careful not to warm the mirror edge with your fingers. This stroke will work on F6 and longer mirrors but may not maintain the figure on short focus mirrors. Sometimes mirror makers will scrape the facet tops with a razor blade and press again to make sure all the facets are the same.
A polished turned edge comes in two flavors. If you polish properly with the lap on top or on a warm day without a sweat band you will almost surely get a bit of turned edge. Next time use the sweat band. If you want faster results work around the edge lightly with the large weegee lap about 10 times around and then use the smoothing stroke.
Then there is the really rolled edge. This likely was produced by a lap that was bigger than the mirror polished surface. If the entire polishing out of the fine grinding was done with an oversize lap you will never retrieve that last 1/8 inch at the mirror edge so just plan to mask it off with a felt pen. If the turned edge was produced during fine grinding and is not polished at all just forget it. If it has a bit of polish you can probably save it if you want to take the time. To save the rolled edge you will need to do some heavy duty polishing at the high rim just inside the rolled edge. This is best done with the weegee lap since you can see where the weegee is and polish precisely. 50 times around with heavy pressure will produce such deep zones that you will need to polish 20 minutes with the full size lap before you can do a star test. Then you will find that the mirror will require more work with the weegee lap and full size lap before it is back in shape. If you plan to correct a rolled edge with the full size lap you will be polishing a very long time.
Zones near the mirror center are usually only minor foot notes in history. Ronch testing at the center of curvature overly magnifies center zones. Make sure the lap is trimmed and pressed into contact at the mirror center.
Zones near the mirror edge may have resulted from reducing a turned edge. If there is a narrow ridge and you try to thumb it and miss then you have made things much worse. Since polishing with the full size lap with the mirror on top removes glass mostly from the mirror center the Telescope Makers Workshop would probably recommend a bit of polishing with the mirror on the bottom. The problem with this is that people forget to rotate the mirror which is now on the bottom and the asymmetric result will only be obvious with an eyepiece test. When I polish with the mirror on the bottom I warm the mirror above the ambient air temperature and cool the edge with the sweat band.
Reducing Dog Biscuit and Ripples
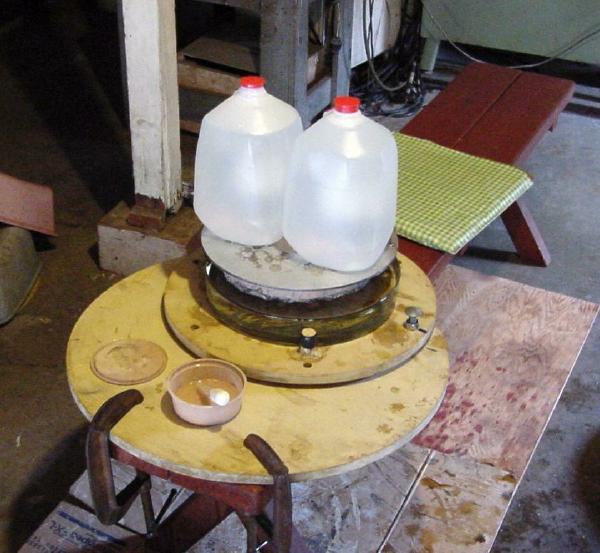
If you polished out in a hurry, well at least fast enough to keep from losing interest, you will have dog biscuit and other artifacts in the Foucault test. Dog biscuit looks just like turbulence but it is stationary so you won't see it when testing in the sunlight. Ripple usually result from use of an undersize pitch lap. Most of this 'stuff' is less than 1/8 wave so pressing and doing the smoothing stroke will take care of it. If the weight of the pitch lap is deforming a thin mirror it is possible to de-load the lap.
If you have a high zone at 80 percent and are slightly under corrected you can do a bit of parabolizing stroke with the marked circle at the 80 percent zone. Otherwise if the mirror is already corrected enough you can polish with a wide "W" stroke and do an extra stroke as the high zone rests on the lap edge. Use light pressure for a short time then test. Even with care it may be necessary to back off with oblating strokes then test then use the parabolizing stroke to finish.
Inventing new polishing strokes won't get you done in minimum time but if you have more mirrors to do it might be worth the trouble. Log the initial figure of the mirror and write down the stroke you plan to use. Do the stroke exactly as written for long enough so its results are obvious then log the results.
Before and After
Before refiguring the 12 1/2 inch mirror the resolution was about 3 or 4 arc seconds measured from a digital photograph. After refiguring we estimated the resolution to be about 1 arc second. We used the double double and compared the black sky between the stars to the stars Ary disk. There was some spider diffraction and variation due to heat waves and it was not a perfect night. The resolution seemed to increase slightly with increasing magnification. I attribute this to aberrations in my eye.


Rework of a Partially Completed 17.5 inch Mirror
The following information relates to the completion of a 17.5 inch diameter x 1 1/2 inch thick mirror. The Pyrex blank was purchased as a second due to thin flakes on the front surface. If a mirror edge is not beveled enough a seemingly insignificant amount of pressure on the mirror edge of a large mirror will cause these flakes. The usual advice is to proceed with the project and ignore the damage.
 |
 |
 |
| Face showing flake chips. | Ripple pattern on back surface. | Focal length measurement, 80 inches. Optics fabrication shops use ROC so be sure to tell them 160 inches when doing a re-work. |
I plan to send the blank off to have the back and face shaped on a glass shaping machine.
After shaping the blank should still be almost 1 3/8 inch thick.
Below is advise from an optician friend regarding the 17.5 inch blank.
Yes, have it ground on the backside also. It can
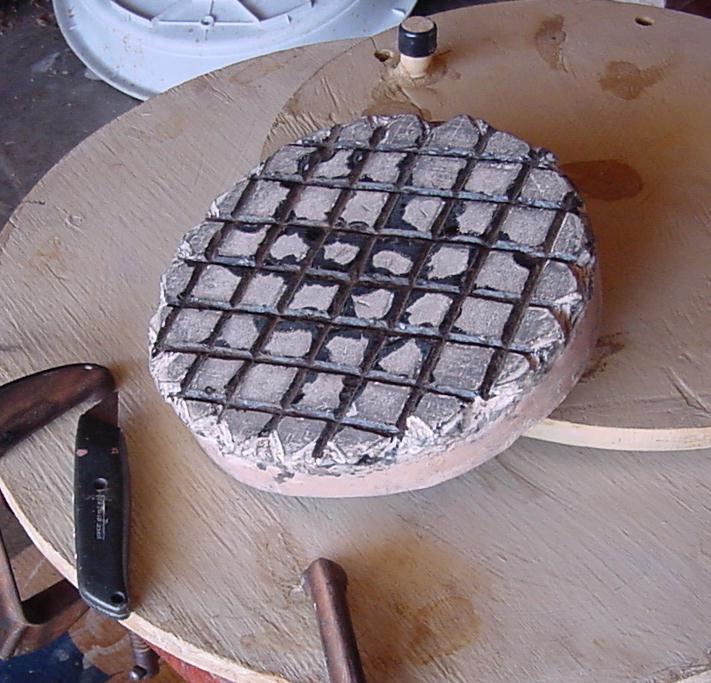
More on plaster tools: http://www.cdcc.sc.usp.br/cda/telescopios/hp-mbartels/largthin/largthin.html#TOOL
be a little on the concave side as well so the blank does not
rock on your polishing stand.
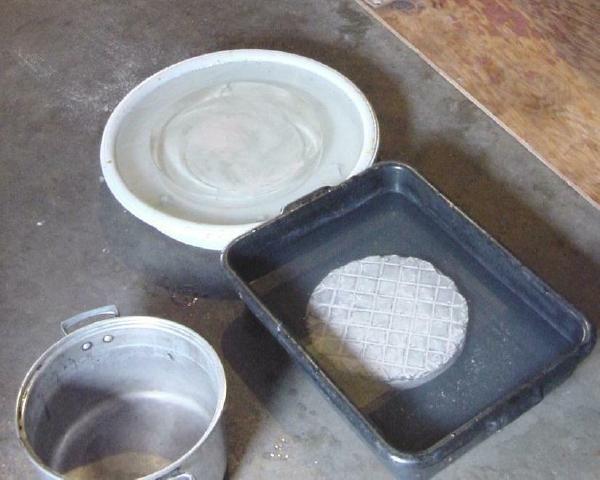
If you need to make a tool, dental plaster is very strong and
can easily be cast into a disk using the mirror as a curved mold
with cardboard packing tape around the edge. 'Excalibur' and
'Die-Keen' dental plasters are 18,000 psi and dry so hard it's
almost like a ceramic material. see:
http://www.hirstarts.com/casting/dental.html. I think you would
need about 20 lbs. for your tool.
If you use plywood, make sure to criss-cross the grain and use
at least three layers of 3/4" ply. Then epoxy or fiberglass all the
surfaces. The problem with this is that the f/4.5 curve for the
tiles needs to be almost .25" deep. That's a lot of grinding!
The plaster tool would eliminate that problem and would be
fun to make. All you need to do is varnish the plaster with
orange shellac or varnish also to waterproof it. Then epoxy the
tiles and away you go in 30 micron grit, 15, and 5 and you
are polishing. The same tool would be excellent for polishing.
Plywood pitch lap tools are notorious for generating
astigmatism...
In reference to parabolizing with a sub diameter pitch lap
I much prefer parabolization with sub-diameter pitch lap with the mirror face up. Use long straight strokes a bit off-center. Pushing the lap through the exact center of the mirror will quickly dig a central hole. If parabolization of edge zones lag, extend the strokes in a slight 'W' to the side, and move the tool further off center. For a 17" mirror the tool should be about 8" diameter with a "star-of-david" type 6 petal star cut in the pitch. The petals are cut bowed out like a leaf, not straight. You can keep the large lap for edge smoothing or returning to a sphere. I would estimate the correction this way to take about 60-90 min. for a 17.5" f/4.5. I would do it in 3 or 4 stages, stopping to test and see the curve deepen. Also let it cool 20-30 minutes before working again and cold press the lap with cerium in middle.
The best mats for supporting big mirrors are the new black perforated rubber sheets they sell in hardware stores for shelf lining.
-G