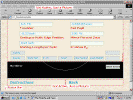
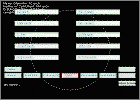
 After
the applet has finished loading the status bar will display: "Legend
slide 1" or "Applet sleeping, move mouse
to awaken" or "The mouse cursor is not over the applet".
See picture at right.
After
the applet has finished loading the status bar will display: "Legend
slide 1" or "Applet sleeping, move mouse
to awaken" or "The mouse cursor is not over the applet".
See picture at right.
The entire applet won't be visible in some browser display modes so if you will be capturing the computer screen to an
image file
for printing you may click 'View' and select the
'Full Screen' option from the browser menu.
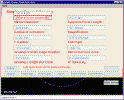
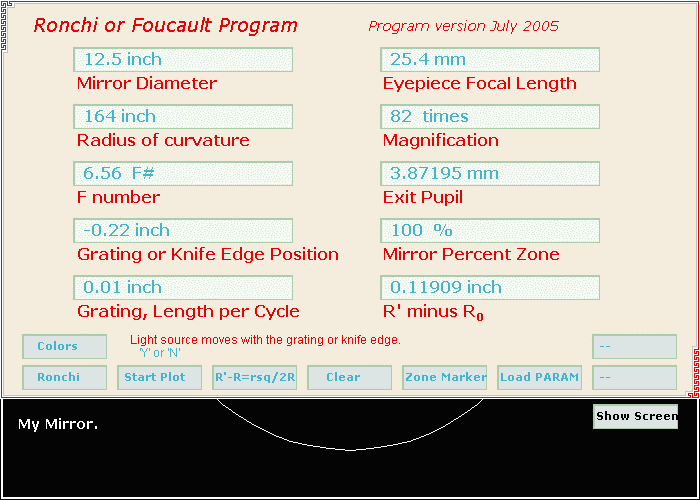
 The
applet should now appear as the picture at right. Lets say your mirror is a
ten inch mirror with a radius of curvature of 100 inches. Put the mouse cursor
in the data display box above 'Mirror Diameter'. The box border should change color to show that it has focus. Click the left mouse button or press
'Enter'. The border of the box should go black momentarily as the command is
accepted. The data display box will move up and a data entry box will appear
where the data display box was previously. Press 'Backspace' until only the 1
remains. Press 0.
The
applet should now appear as the picture at right. Lets say your mirror is a
ten inch mirror with a radius of curvature of 100 inches. Put the mouse cursor
in the data display box above 'Mirror Diameter'. The box border should change color to show that it has focus. Click the left mouse button or press
'Enter'. The border of the box should go black momentarily as the command is
accepted. The data display box will move up and a data entry box will appear
where the data display box was previously. Press 'Backspace' until only the 1
remains. Press 0.
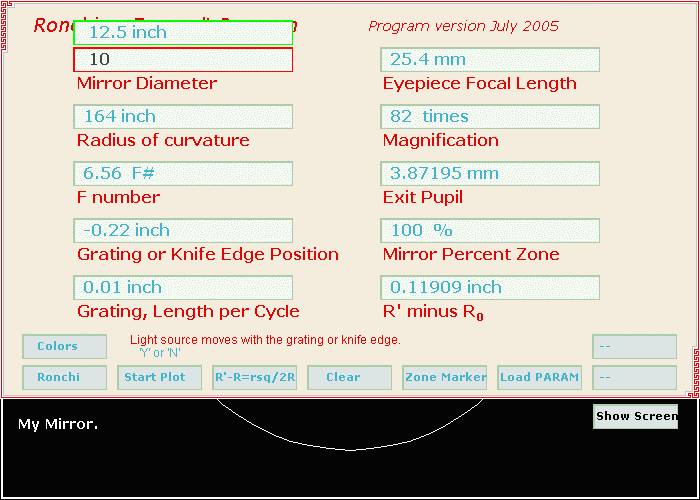
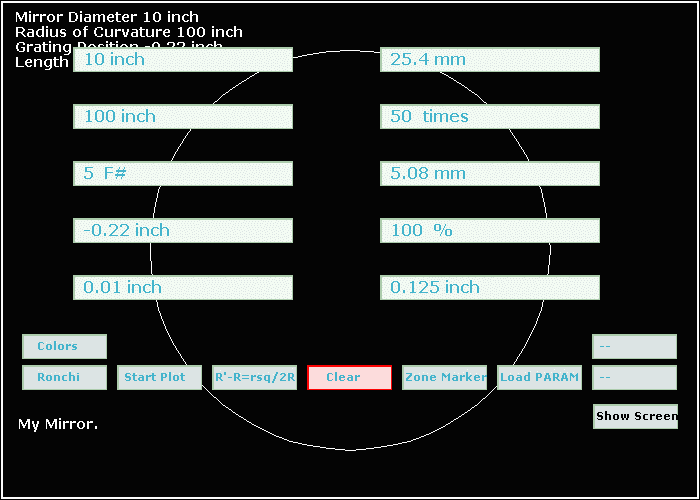
 The
applet should now appear as the picture at right. Next press 'Enter' or
press the left mouse button. The applet should show 10 inch above the heading
'Mirror Diameter'. Repeat as above for the radius of curvature.
The
applet should now appear as the picture at right. Next press 'Enter' or
press the left mouse button. The applet should show 10 inch above the heading
'Mirror Diameter'. Repeat as above for the radius of curvature.
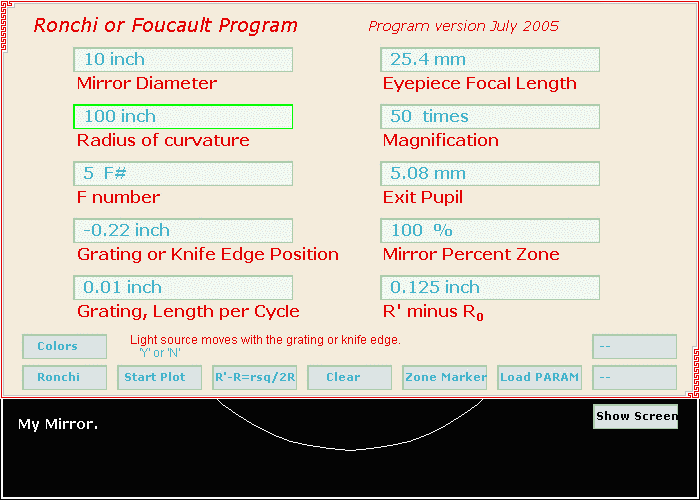
 The
screen should now appear as the picture at right.
The
screen should now appear as the picture at right.
 Press
the 'Clear' button once. The applet should appear as the picture at right.
Press
the 'Clear' button once. The applet should appear as the picture at right.
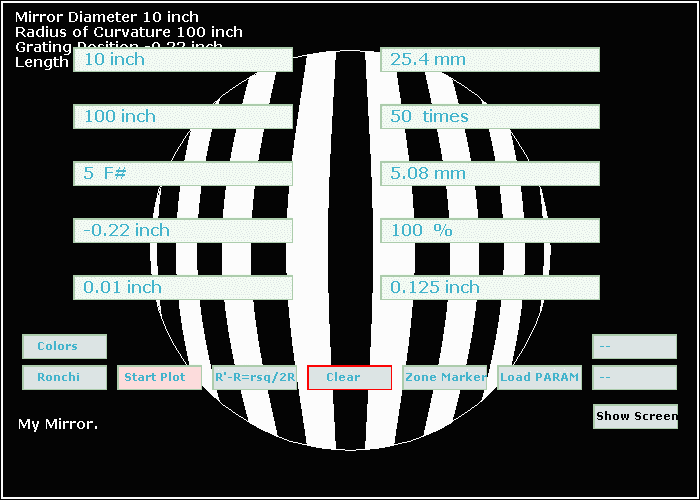
 Press
the 'Start Plot' button. The applet should appear as the picture at right
after the plot is finished. We wanted to have five vertical bars on the plot.
This plot has seven bars so we will adjust the knife edge position.
Press
the 'Start Plot' button. The applet should appear as the picture at right
after the plot is finished. We wanted to have five vertical bars on the plot.
This plot has seven bars so we will adjust the knife edge position.
 Note
the 'Clear' button is outlined in a red frame. If we want the background with
the legend again we should press the 'Esc' key.
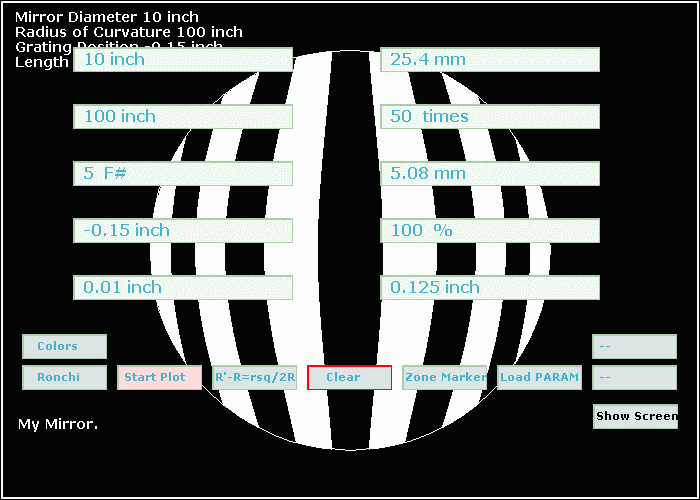
But we want to make another plot so we press the red outlined 'Clear'
button and the Ronchi plot clears. After adjusting the knife edge position
and plotting again we still don't
have the five bars we wanted. So we change the knife edge position again and
plot and we have the display at right which looks good as a pattern to use
while testing our 10 inch mirror.
Note
the 'Clear' button is outlined in a red frame. If we want the background with
the legend again we should press the 'Esc' key.
But we want to make another plot so we press the red outlined 'Clear'
button and the Ronchi plot clears. After adjusting the knife edge position
and plotting again we still don't
have the five bars we wanted. So we change the knife edge position again and
plot and we have the display at right which looks good as a pattern to use
while testing our 10 inch mirror.
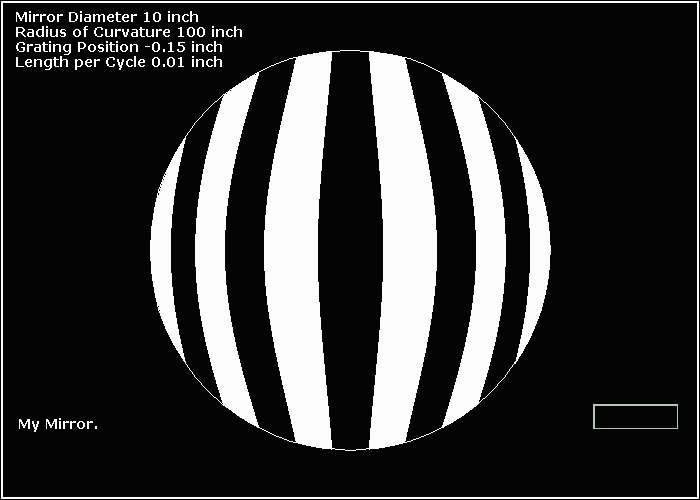
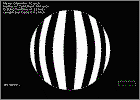 We
want to see the screen without the data display overlay so we press the 'Show
Screen' button at the bottom right of the frame. The applet now appears as the
picture at right.
We
want to see the screen without the data display overlay so we press the 'Show
Screen' button at the bottom right of the frame. The applet now appears as the
picture at right.
Note, this plot was made with a 100 line per inch grating. We know this by
looking at the
'Grating Length per Cycle' data box. If we now want to use a 60 line per inch
grating we should change the 'Grating Length per Cycle' to: 1 divided by 60 =
.01666
Making a Printout of the Screen
The Java 'Image' data type depends on the operating system, PC or Mac or
other. This makes an image capture in Java a bit tricky at least at present.
Also our Java application is operating inside a browser and thus will require a special certification to
allow the applet to write a file onto your computer's hard drive.
However there is an alternative.
To save the screen when using Microsoft Windows 95/98/XP you will need to
download third party software. The type of program is called a screen capture
program. The screen capture program runs on your computer outside of the
browser environment. When activated it will capture whatever happens to be on
the computer's screen, apparently directly from screen memory. The screen
capture program will allow you to save the image in whatever file format you
like, .jpg .gif etc. Then you can print the image file, attach it to an email
or whatever. I have been using a program called PrintKey
for screen capture. Screen capture is available without third
party software in some later operating systems.
Running the Applet on Slow Computers
The Ronchi / Foucault Java Applet was written on a 100 mHz late 1995
computer running 'Windows 98'. The program runs fast in the 'Applet
Viewer' which can be downloaded from 'Sun Microsystems'. In the Browser it
runs slower. Most of the testing was done using 'Microsoft Internet Explorer' which
runs Applets faster than some other browsers. As with any computer the more
programs that are running the longer it will be before the computer's processor
returns to service the browser. The keyboard and the mouse should still work if you have patience. If you
can't enter your mirror's data into the program while it is running then save
a copy of the original ronchi.html file and edit the PARAM s in the ronchi.html
file with a text editor such as 'Microsoft Notepad'. To open an
.html web
page file with Notepad select 'File', 'Open', then select 'All Files ( *.* )'
then you will be able to see the ronchi.html file in the selection box. If you
have copied the 'ron_prog' folder from the 'Telescope Program' C/D to your
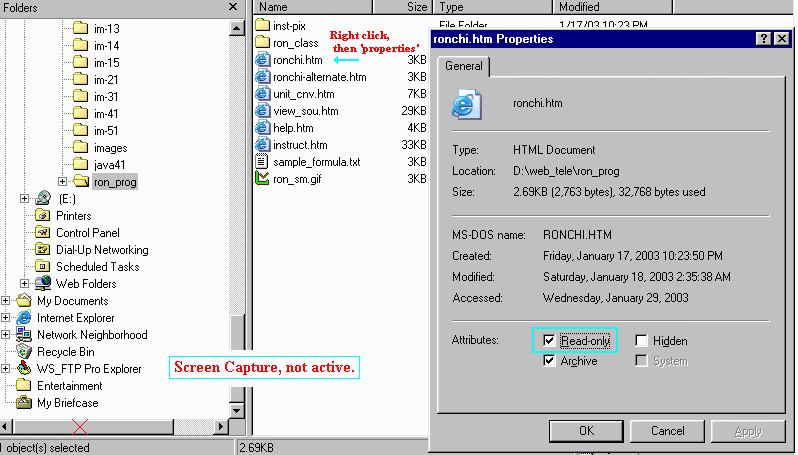
hard drive it is likely that all the files have been set to 'read only'. To
change the 'read only' attribute open Windows Explorer and uncheck the read
only attribute in the properties box.
Using WindowsXP and a ~one gigHz Dell Notebook the program seems to run
faster in the browser than in the Applet Viewer.
The Mozilla Foundation's Firefox Browser
runs Java Applets easily and is referenced on the Sun
Microsystems website. The Firefox Browser is available for multiple
operating systems and languages.
Browsers are very picky about running applets and for good reason. By the
time the browser finishes checking the applet you may think the computer has
hung. If it just takes too long and you want to quit the applet then hold down
Ctrl, Alt and Del at the same time and Windows will give you a chance to dump
the applet from processing in memory. Although the program has been tested
with the usual types of mirror data there are too many variables to test every
possibility. Best to save documents in other programs to the hard disk and
shut down all but the browser before you start the applet. When the browser
loads an applet either from a C/D or from the internet it converts the
universal Java code in the Java.class file into code that
will run in the local host computer. If you browse many Java applets on the
internet the browser will store more local code for each applet. The browser
handles local compiled Java code differently than it handles web pages. Pressing
'Refresh' will re-initialize the Java applet but will not dump and reload the local Java code store. Closing the browser will get rid of the local stored
Java code compiled from the Java.class file.
Current issues with the Ronchi / Foucault Java Applet
When the program has been uploaded to an ISP provider then run at a public
library computer it is not possible to dump the local Java memory store
without closing the library's internet browser. Most libraries do not allow
users to close the internet browser.
Ron Program- update log.
Back
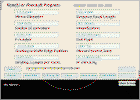
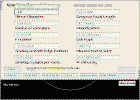
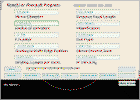
 Instruction Detail
'Mirror Diameter'
Put the mouse cursor over the button for focus.
Press left mouse button or 'Enter' key for data entry.
Press 'Esc' or move the mouse away to cancel data entry.
Active keys for data entry: 1, 2, 3, 4, 5, 6, 7, 8, 9, 0, - and . and
Backspace and 'Space Bar'.
Use the - key to change the sign of a number.
Most other keys will blink then be rejected.
Press left mouse button or 'Enter' key to complete data entry.
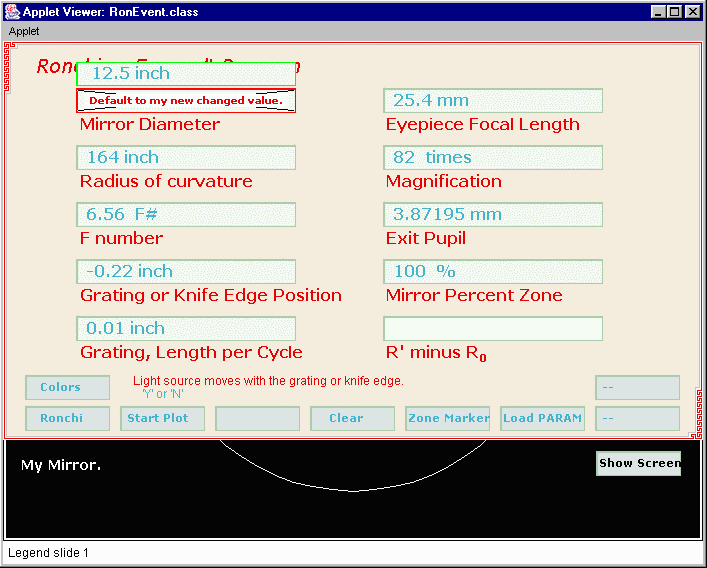
 If
you want to change the default mirror diameter without editing the .html file
place the mouse cursor over the data entry button and 'left mouse click' as if
you planned to change the entry. Then 'left mouse click' on the box
above the data entry box. The display will show "Default
to my new changed value." momentarily
as the data entry cancels. See picture at right. Thereafter the program will show
your new value in
the data entry box for you to edit next time. This is useful, for instance, if you want
to make small changes in the value for knife edge position without re entering
the entire number. If the program is re started it will re initialize from the
.html file or from default values that were set in the Java.class code file.
If
you want to change the default mirror diameter without editing the .html file
place the mouse cursor over the data entry button and 'left mouse click' as if
you planned to change the entry. Then 'left mouse click' on the box
above the data entry box. The display will show "Default
to my new changed value." momentarily
as the data entry cancels. See picture at right. Thereafter the program will show
your new value in
the data entry box for you to edit next time. This is useful, for instance, if you want
to make small changes in the value for knife edge position without re entering
the entire number. If the program is re started it will re initialize from the
.html file or from default values that were set in the Java.class code file.
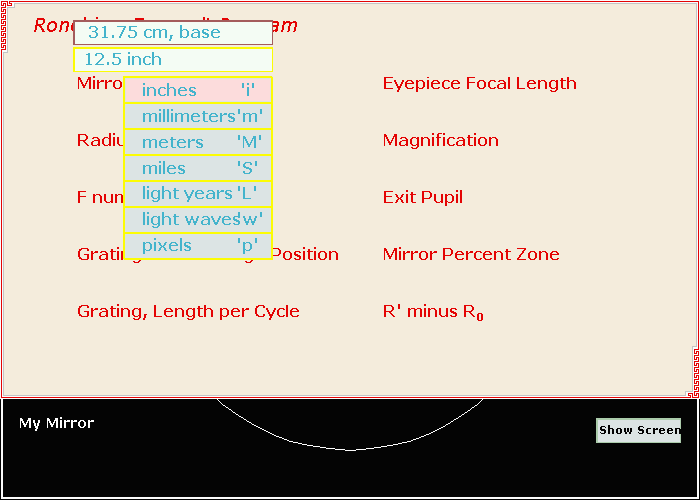
This program is able to accept length data entry in the following units:
'M' meters
'm' millimeters
'w' light waves
'i' inches
'S' miles
'A' astronomical units
'L' light years
 To change the units:
Press the right mouse button to obtain the display at right.
If your setup won't accept 'right mouse button' press \ instead.
To cancel the display shown at right press 'Esc'.
To see the present length in another unit of length run the mouse
cursor over the units of 'length units selector box'.
To accept another system of units put the mouse cursor over the desired
units and press 'Enter'. If you want to use the program mostly for converting
units you can set a PARAM in the
.html file to allow you to see more significant figures to the right of the
decimal point.
The 'nnn cm base' data display box visible while 'length units selector
box' is active will always display the mirror diameter
in centimeters. 'Base' refers to the fact that length values are stored
in this program in units of cm.
All length data input to the program is converted to cm
first then to the other units as required for display. All calculations
internal to the program are done in cm or screen pixels.
Light wave is set
to 530nm,
( nanometers ) with a PARAM in the .html file. If you
want to know your length in a wave length in the infra red the PARAM can be
changed and the program re started.
While the system of units box is being displayed you can start a screen
saver type of display by pressing 'Shift
~'. To cancel the
screen saver display press 'Esc'.
'Radius of Curvature'
The 'Radius of Curvature' data display and entry works the same as the
'Mirror Diameter' data display and entry.
'F Number'
The 'F Number' is a 'dependent variable'. F number in this program depends
on radius_of_curvature divided by ( 2 times mirror_diameter ). The radius_of_curvature
is Ro, radius of curvature at the mirror center.
'Grating or Knife Edge Position'
The 'Grating or Knife Edge Position' data display and entry works the same
as the 'Mirror Diameter' data display and entry. Negative numbers are closer
to the mirror than the radius_of_curvature, Ro, positive numbers are farther.
'Grating, Length per Cycle'
The 'Grating, Length per Cycle' data display and entry works the same as
the 'Mirror Diameter' data display and entry. Display goes blank in the
'Foucault' mode. Length per cycle = 1 / cycles_per_length. For a 100
line per inch grating use .01 = 1 / 100.
|
LPI |
1 / LPI |
| 50 |
.02 |
| 60 |
.01667 |
| 100 |
.01 |
| 120 |
.00833 |
| 150 |
.00667 |
The data entry and display windows on the right side of the
applet are not needed for making a plot for mirror testing except for one
special exception where the percent data entry will be covered by the
constant_B data entry which is used while in the R' - Ro =
f(n) mode selection.
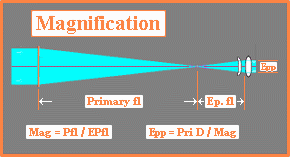
'Eyepiece Focal Length'
The 'Eyepiece Focal Length' data display and entry works the same as the
'Mirror Diameter' data display and entry. Magnification and exit pupil
depend on eyepiece focal length.
'Magnification'
'Magnification' depends on eyepiece_focal_length and raduis_of_curvature.
Magnification = (raduis_of_curvature / 2) / eyepiece_focal_length.
'Exit Pupil'
'Exit Pupil' depends on eyepiece_focal_length, raduis_of_curvature and
mirror_diameter.
exit_pupil = mirror_diameter /
magnification.
Right mouse click to change length units.
To save display screen area the 'Mirror Percent Zone' data entry and display will be covered by the
'constant_B' data entry and display
if 'constant_B' setting needs to be changed.
|
'Mirror Percent Zone'
'Mirror Percent Zone' data entry and display will not affect the plot of a
Ronchi pattern by this program. The R' minus Ro data display depends on 'Mirror Percent
Zone'. Mirror percent zone is a percentage of the mirror's radius.
0 is the mirror
center, 100 is the mirror edge.
|
'Constant B'
To use the 'Constant B' data entry press the b key on the
keyboard.
See: R' - Ro = f(n) mode selection
|
'R' Minus Ro'
'R' minus Ro' represents the difference between the radius_of_curvature at
the mirror's center and radius_of_curvature_xy at 'Mirror Percent
Zone'. The radius_of_curvature_xy of a mirror zone minus the
radius_of_curvature of the mirror center is needed as a reference value when doing
a knife edge
test.
The value of 'R' minus Ro' at percent_zone depends on the function selected with the
function selector button. Since functions
other than R_sq / 2r can be selected it is possible to obtain knife edge
references for non parabolic mirrors.
'Colors'
 The
'Colors' button when pressed will change the plotting color. There are six colors available for the Ronchi display and
six colors
available for the Foucault display. The first three Foucault colors have the
same luminosity with different hue. The next two Foucault colors have low and
high luminosity. The last color in both the Ronchi and Foucault program is a
user defined color. To change the user defined color you must edit a PARAM
in the .html file. You can use Microsoft Paintbrush to find the
RGB
,
red, green and blue components of your favorite color. To make your favorite
color ready when the program starts without selecting there is another PARAM.
If you
don't like colors you can also edit a PARAM
in the .html file.
The
'Colors' button when pressed will change the plotting color. There are six colors available for the Ronchi display and
six colors
available for the Foucault display. The first three Foucault colors have the
same luminosity with different hue. The next two Foucault colors have low and
high luminosity. The last color in both the Ronchi and Foucault program is a
user defined color. To change the user defined color you must edit a PARAM
in the .html file. You can use Microsoft Paintbrush to find the
RGB
,
red, green and blue components of your favorite color. To make your favorite
color ready when the program starts without selecting there is another PARAM.
If you
don't like colors you can also edit a PARAM
in the .html file.
| Ronchi Colors |
Foucault Colors |
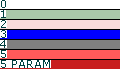 |
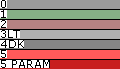 |
|
0 255 255
255 LUM 240
1 170 200 170
LUM 174
2 250 220 220
LUM 221
3 0 0
255 LUM 120
4 128 128 128
LUM 120
5 255
90 90 LUM 162
5P 200 30 30 LUM 108 |
0 155 155
155 LUM 146
1 134 176 134
LUM 146
2 181 130 130
LUM 146
3L 176 176 176 LUM 166
4D 133 133 133 LUM 126
5 255 90
90 LUM 162
5P 200 30 30 LUM 108 |
'Ronchi / Foucault Selector'
The 'Ronchi / Foucault Selector' button has three states:
Ronchi plot normal
Foucault plot
Negative Ronchi plot
One each Ronchi plot and one each Foucault plot can exist at the same
time.
Pressing 'Clear' twice will clear both ( all ) images.
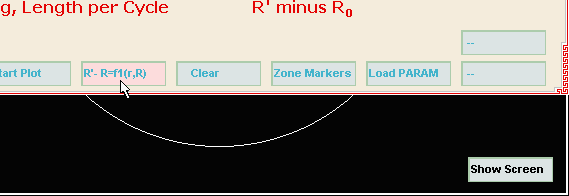
'Start Plot'
The 'Start Plot' button is pressed after we have set up our mirror's
parameters. While the plot is in progress there is a high usage of your
computer's processor. It is possible to stop the plot using the 'Clear' button
but it may take a while. If you can't wait press 'Ctr, Alt and Del at the same
time. ( Hope you had saved that CAD drawing before you started. )
' R' minus Ro = some function of r '
 The 'R' minus Ro' button can select five different functions. The program
initializes with the
The 'R' minus Ro' button can select five different functions. The program
initializes with the
r_squared / 2R function. Four 'left mouse click' will get
you to function five, the R' = Ro function. If R' = Ro we have a sphere. The
other three function selections are a bit more complicated. The functions used
for the other three functions are specified as PARAM s in the web page. This
Ronchi program is capable of parsing the math formulas in the applet PARAM s.
If you view the web page source code you will see the three PARAM s:
PARAM NAME=function1
PARAM NAME=function2
PARAM NAME=function3
The function you can put into the
<PARAM NAME=function(n) Value="
" > is similar to the function you would use in a line of BASIC
code. The function always returns R' minus Ro.
r placed into the function is evaluated as the current r(xy) for the zone.
R placed into the function is evaluated as the radius of curvature of the mirror
center. Operators available to the
function parser. Other operators or alphanumeric characters will be
ignored.
Since the operators can be used in an almost infinite number
of combinations we supplied the program with a viewer for the function
parser. Using the viewer you can find if the parser is doing what is
expected.
The viewer for the parser is controlled by 'right mouse click' on the
function selector button.
If 'right mouse click' is unavailable then put
the mouse pointer over the function button and press \
Since we will be making a calculation for each pixel of one quadrant of a
circle of radius 200 we will be calculating about 31415 pixels. The function
parser will repeat the parsing for each of these pixels. If we slow the
process down enough to see the parsing for one pixel then its obvious that it
will take longer than we want to wait for the entire process to finish. So the
'right mouse click' not only turns on the parsing viewing but also controls
the speed of the parser. If we want fast completion then we will plot
800 'count' parses to an off screen image before returning the computers
processor for screen display and button and keyboard scan. During the 800 'count'
the applet is locked up.
| control |
button frame color |
'count' |
Time delayed in milliseconds. |
Show the calculations |
| 0 |
|
800 |
0 |
false |
| 1 |
|
10 |
0 |
false |
| 2 |
|
1 |
0 |
true |
| 3 |
|
1 |
500 |
true |
| 4 |
|
1 |
4000 |
true |
If you want the plot to finish fast select
for the button frame color. Then if you want to quit during mid plot 'left mouse click'
on the 'Clear' button and in
a short time the plotting will stop and clear. The time it takes to clear
depends on the computers speed and the complexity of the formula that is being
parsed.
If you want to see the
plotting and may want to clear the plot early then select
for the button frame color before hitting 'Start Plot'.
With
selected the processor will check for user input after
every 10 plots. Then you can cycle through ,
,
and back to
using 'right mouse click' or \ . Every 'right mouse click'
halts plotting for 2 seconds to allow more user input. For example
another 'right mouse click' within the 2 seconds to get past .
If you are in
and can't get out then 'left mouse click' anywhere on the applet background
and after a while the program will change to .
There are sample
formula that you can paste into your copy of the ronchi.html file using
Notepad or some other .txt ( text file) editor. Then you can browse the
ronchi.html file with your browser to test the formulas. To open an
.html
web
page file with Notepad select 'File', 'Open', then select 'All Files ( *.* )
then you will be able to see the ronchi.html file in the selection box. If you
have copied the 'ron_prog' folder from the 'Telescope Program' C/D to your
hard drive it is likely that all the files have been set to 'read only'. To
change the 'read only' attribute open Windows Explorer and uncheck the read
only attribute in the properties box.
The formula parser
has several error codes that it
will announce with a bell when it finds an error in a formula. The
error description will appear briefly in the browser status
bar. When trying
to test your formula it is well to spread the formula out in the available variable
space to make viewing the parsing easier. If there is a problem making the
parser parse the formula correctly try rearranging the formula or adding
parentheses. Cycle through the formulas with the 'R' minus Ro'
selector button without starting the plot and make sure there is some number in the 'R'
- Ro' data box for your formula. Use a computer that you can safely
re-boot while experimenting with different formula.
'Clear'
The 'Clear' button has two steps.
The first press allows you to see the display screen without removing the
data entry buttons from the display. The frame for the 'Clear' button
will be red after the first press. Press the 'Esc' key to cancel and return
the legend for the data entry buttons.
The second press will clear the off screen Ronchi and Foucault images and
the off screen display image and redraw the display screen outline and legend
on the off screen display image and paste it to computer screen memory.
The second press should also reset the program but leave the data entries you
have made for your mirror.
Pressing the 'Ctrl' key will arm the 'Clear' button to bypass the Ronchi
program. Pressing the 'Esc' key will
cancel the pressing of the 'Ctrl' key. When the program is bypassed by
pressing the 'Ctrl' key then the 'Clear' button the program 'thread' is stopped and the graphics method will only display a small image to the
screen with the message "Ron program is bypassed". The only way to
restart the Applet is to use 'Refresh' on the browser or select another .htm
page and then use the back button on the browser. The program will then re-initialize using the same Java
code that had been loaded previously. On initialization all the program
variables are reset and the PARAM s reloaded from the ronchi.html file. While the
Ronchi program is in the bypass mode it will use almost no processor time. This is
sometimes useful on slower computers.
 'Zone Markers'
The 'Zone Markers' has four states;
Off
Orange percent scale
User defined zone markers
User defined zone markers with a legend for making a zone stick or zone
mask.
The 'Zone Markers' is cycled through the states by pressing the 'Zone
Markers' button.
The 'Zone Markers' may be cycled backwards through the 'Zone Markers'
states by pressing 'Esc'. When the 'Off' state is reached the 'Esc'
key will resume its normal program function.
The zone markers can be cycled at any time except while plotting is in progress.
When the
program is selected to 'Foucault' there is a representation of a knife edge on
the left side of the screen. Zones on the mirror that focus more distant
from the mirror than the knife edge are shaded on the same side as the knife
edge. Zones that focus nearer to the mirror than the knife edge are shaded on the
opposite side.
The User defined zones are read from the ronchi.html file when the program
initializes.
Changing the user defined zones:
If the user defined zones must be changed that is done
by editing the ronchi.html file before starting the 'Ronchi Applet'. See
the annotated ronchi.htm file.
'Load PARAM'
If you have changed the parameters in the data entry buttons and decide you
want the setting as they were then press 'Load PARAM'. When the program
initializes ( begins ) it reads various parameters from the ronchi.html file.
When you press 'Load PARAM' the program will re initialize the data entry
buttons using the PARAM s in the .html file. If you edit the PARAM s in
the ronchi.html file using Notepad outside the browser then hit 'Load PARAM'
the new PARAM s you put in the ronchi.html file will not be used until you hit
'Refresh' on the browser. This is because the browser is using a copy of the original
ronchi.html file.
'Load PARAM' does not reload all the PARAM s, only mirror diameter, radius
of curvature, grating or knife edge position and grating frequency.
'Save PARAM'
'Save PARAM' is not yet available in the browser version of the Ronchi /
Foucault Program. To save the PARAM s the applet must have access to the
ronchi.html file while it is running inside the browser environment. We have
not yet obtained the required security clearance for access to the file system
from within the browser. Another version of the program that runs in the
'Applet Viewer' will save the PARAM s to the proper locations in the
ronchi.html file.
'Save Picture'
'Save Picture' is not yet operational. To save the screen picture you can
use third party software that operates outside the browser environment. Some
browsers may be able to save applet images but when you print the page you
usually get nothing where the applet image should be on the webpage.
Later versions of Microsoft Windows are able to capture screen memory
and make the pictures available in Microsoft Paintbrush. Look in: Start,
Help, and type in 'screen' in the help index. Look for the heading
"screen contents, copying".
'Show
Screen'
With the background legend showing one click shows the Ronchi / Foucault
plotting screen without the buttons. The 'Show Screen' button is then black if
the mouse is not over it and shows 'Show Menu' if the mouse is over it. One
click then will bring back the background legend and the buttons painted over
the legend.
If the legend and buttons are showing and you want to see
the buttons but not the background legend click on 'Clear' once.
Active
Keys on the Keyboard
The escape key. Generally used to cancel some
program mode that we selected by mistake:
Esc
Number Keys for Data Entry:
Pressing
a number key concatenates that number to the data entry array and displays the
changed data entry array. Back space removes a number. '
' = = 'Space Bar' removes all the numbers but leaves the
minus sign unchanged.
1 2 3 4 5 6 7 8 9
0 - . backspace and the 'Space Bar' and the Enter key.
Substitute for 'Right Mouse
Button':
\
On your tester does the light source move with the
knife edge or grating or is the light source stationary and only the knife
edge or grating move. If the light source is stationary the knife edge
or grating must move twice as far.
Shift
Y Light source moves with the
grating.
Shift N
Light source does not move with the grating.
You can edit a PARAM
in the .html file to make the program initialize either Y or N.
Request program bypass:
'Ctrl' followed by the 'Clear'
button will stop the program from running. When the program is bypassed the
Java code remains in memory but is inactive. 'Refresh' on the browser will
re start the program and re initialize all variables. You can also press the
'Ctrl' key to suspend plotting then press the 'Esc' key to resume as before.
Ctrl
View the data arrays that hold the button
properties:
Shift ?
Scroll through the button
data array properties ( left or right ):
<
> ( , or . )
Show
the button outlines while viewing the button properties.
\ ( or
'right mouse click' )
Cancel view the
data arrays that hold the button properties:
/ ( or Esc )
To
change the value of B in a formula loaded from the
.html page press b on the
keyboard and enter a value for B in the 'Constant B' data entry.
B is used in the R' minus Ro formula.
Pressing Esc or b a second time cancels the 'constant_B' data entry
box.
b ( or B )
To change the units of
measure ( inches.. meters ) right mouse click on a data entry button.
While
in the units of measure mode you can start a screen saver display similar to 'Pong'.
While the units of measure box is visible press:
Shift ~
The
above keys are part of the Ronchi Java Applet program. While the program is
running in a browser there are other keys such as PgUp and PgDn that the browser
will use. In Microsoft Internet Explorer if you 'Left Mouse Click' on the
web page in an area that is not on the Applet then the browser keys will be active.
If you mouse click over the Applet then the Applet keys will be active.
When
changing browser settings it may be less confusing to use the mouse on the
browser menu bars.
Explanation
of the Ronchi Applet Source Code
Back
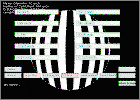
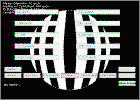
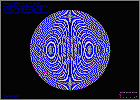
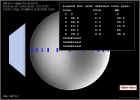
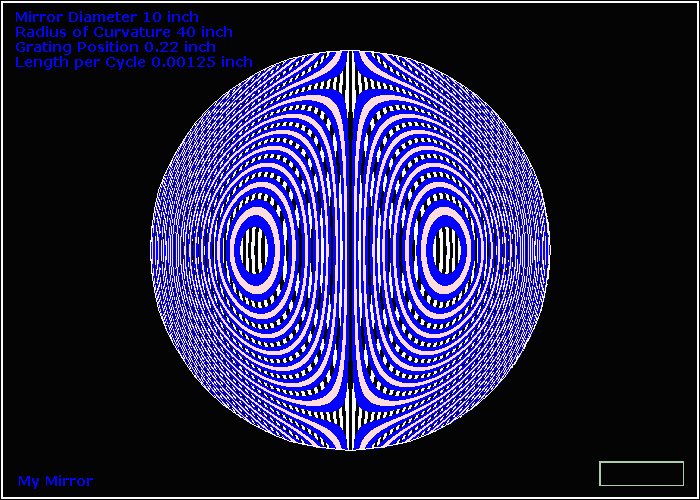
 The Ronchi program generates the curved bars seen
while testing the mirror near the radius of curvatur
The Ronchi program generates the curved bars seen
while testing the mirror near the radius of curvatur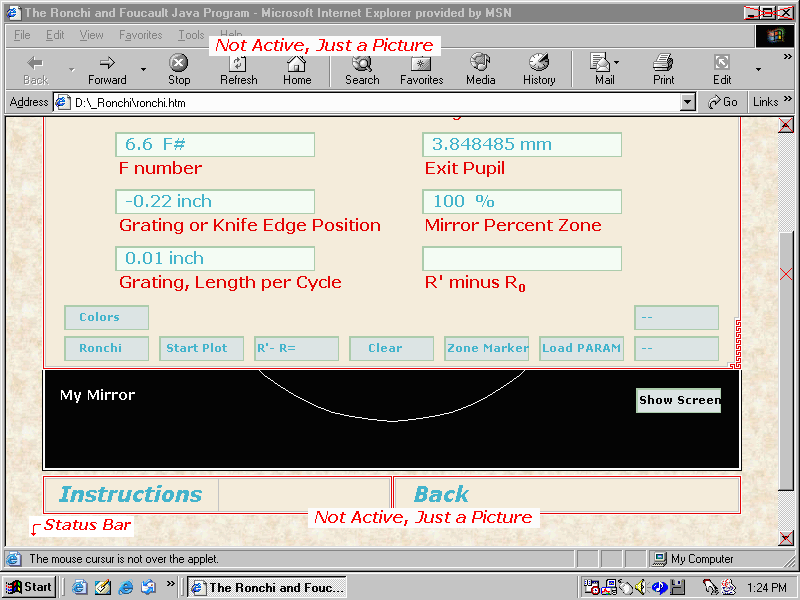